Back to Don's Maps
 Bushwalking Index
 Lightweight Bushwalking / Hiking Gear
The lightest alcohol stove for hiking
- and the easiest to make!
Click on the photos to see an enlarged version
All weights are ±1 gram, since the scales weigh to the nearest two grams.

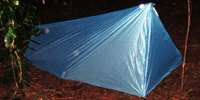
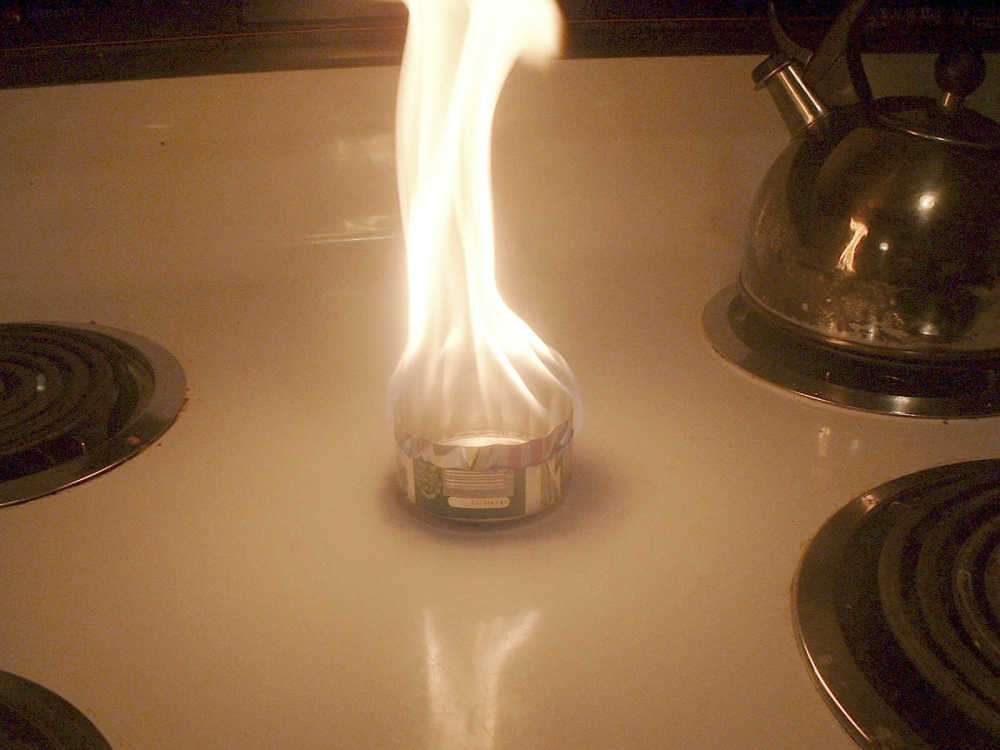
This stove (a friend of mine, Ian MacLeod, named it the SS, or Simple Stove) weighing four grams (!) boils 200 ml of water in less than three minutes.
It uses alcohol (spiritus, ethyl alcohol, denatured alcohol, methylated spirits) as a fuel.
Do not use anything else!
Photo: Don Hitchcock January 2009
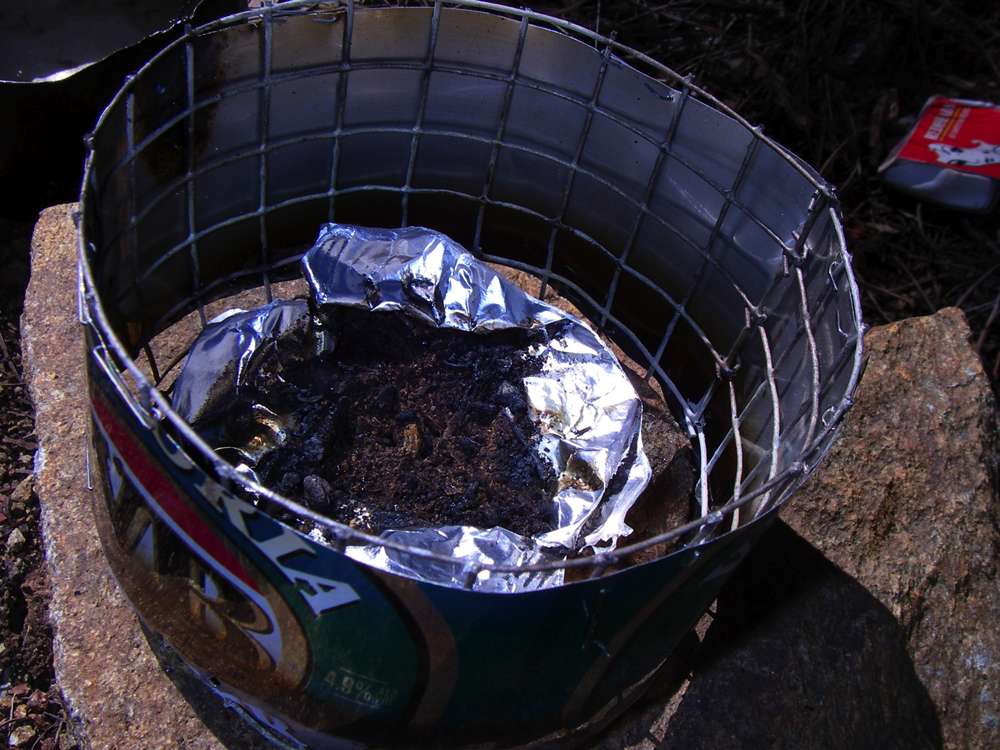
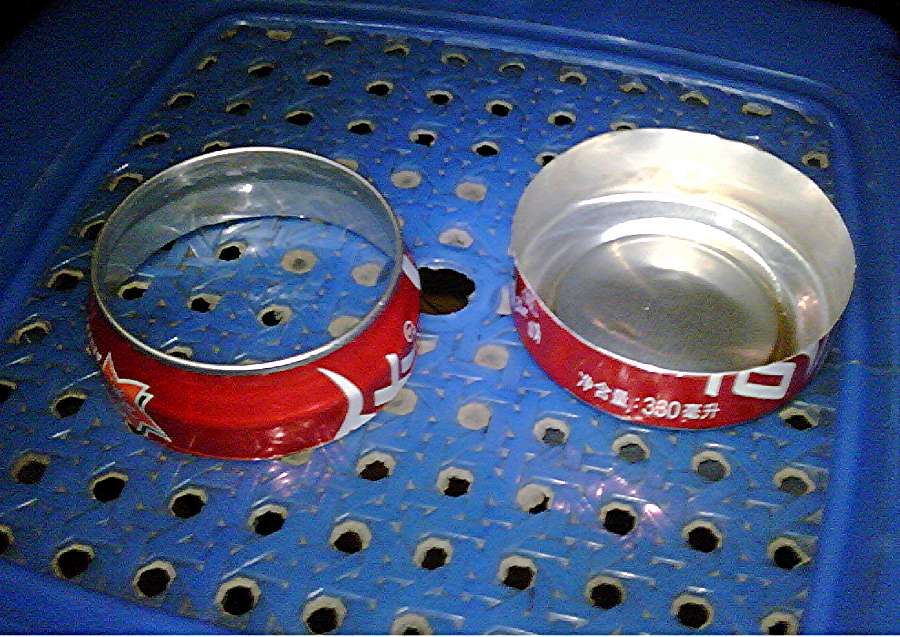
It is the base of a beer can, coke can, or any aluminium or aluminum can such as a pop can. The extra strip of aluminium, again from a beer can, slightly decreases the boil time, and slightly increases the consumption of alcohol. I call it a "virtual wick", since it uses capillary attraction to carry fuel up to the top of the wick/stove wall interface.
The stove could hardly be simpler to construct. It is one inch high measured from the bench top, and the strip of the side of a beer can has been cut and stapled so that it is a close fit to the inside of the can. The strip should be no higher than the outside of the can, otherwise spitting can occur.
One inch seems to be the best height for the stove, from bench to the top of the stove.
Lower than that, and you do not have enough height for a sloping site, or for enough alcohol for a large pot of water.
Higher than that, and the stove does not work well because the oxygen cannot get to the alcohol so easily.
Eventually the staple on the aluminium strip will rust out, but it works fine without the staple by that time, because the aluminium will have lost its temper, and is then easy to bend to the right shape until you get home to a stapler.
However it is essential that the wick be a snug fit all the way round the inside of the stove for the wick to work.
It relies on there being a very narrow space between the two so that capillary action can carry the fuel up to the top of the wick/stove wall interface.
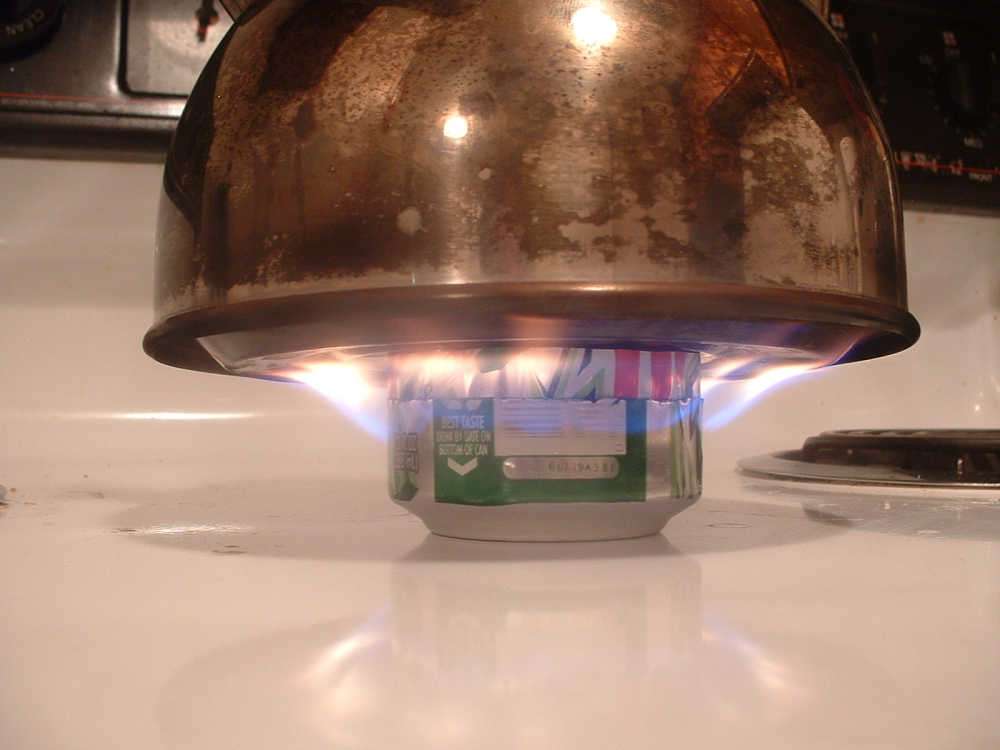
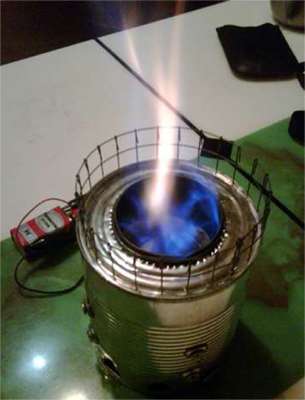
The strip acts as what I call a "virtual wick" and produces a satisfying blue flame when the stove is lit inside the roundpod and with a pot on top. Otherwise there is more of the familiar yellow flame. Once it has been going a little while, flames come up the side of the pot a little way, though they are nearly colourless.
This design is about number 47 of the ones I have copied, or designed myself, and made.
Ye gods and little fishes, there are a lot of beer can stove designs out there!
I've made a lot of them, and made a lot of my own. Most were less than successful, one took twenty minutes to boil two cups of water. One brilliant design I concocted boiled water very quickly indeed, less than two and a half minutes for my standard 200 ml of water - but was impossible to blow out.
Photo: Don Hitchcock January 2009
The simplicity and ease of construction of this particular design are matched by its ease of use.
First make sure that the surface you are putting it on is level and non-combustible. Clear away any leaf litter or twigs, down to bare earth, or put it on a flat rock. If you are in civilisation, put it on a concrete surface, not on a painted area, it will blister the paint for sure, I've done that.
Next make sure there is nothing likely to burn close by. Put your pack and other gear uphill from the stove, or a sensible distance away. Always, before striking a match, think "If I poured out this alcohol just after lighting it, what damage would occur?" and take appropriate action.
Enough alcohol to just cover the bump in the middle of the stove base is about right for 200 ml (a small cup) of water. You are working with an open container of burning liquid. I've not had a disaster yet, but vigilance is the price of using stoves. Don't light it inside a tent, for instance, do I need to say that?
It is relatively easy to blow out when your water has boiled, and you can then pour the excess back into the bottle. However it is difficult to blow out with the windshield and especially the roundpod there.
First, take away the windshield. The end of the windshield that is curled outside the rest will still be cool, lift it off carefully.
Next, the roundpod has two handles of the twisted stainless steel wire. These will be warm but not hot, usually. Lift the roundpod off carefully, making sure you don't catch the stove and tip it over and put it to one side. Get down close to the stove, and blow it out, it sometimes requires a couple of sharp puffs. If you can't get the hang of it, let it burn out, or add a bit of water to the mix, then you can blow it out easily. The small amount of extra water won't affect the burning of the rest of your fuel significantly.
Photo: Don Hitchcock January 2009
When you are quite sure it is out, and the stove and the alcohol have cooled down, pour the excess fuel back into the bottle.
Light the residue in the "empty" stove, and in a few seconds it will go out again, and you can pack it away without fumes once it has cooled down, in a plastic ziplock bag. Or just let the residue evaporate - you still have to drink your coffee!
If you want a slow simmering flame, as when cooking an evening meal, add water to the alcohol fuel. When it goes out, add a little more alcohol to the "water" in the stove, and continue.
Be warned, in bright sunlight it can be impossible to see the flame, and especially if you have added water!
If you add alcohol while the residue is still burning, you have a "Houston, we have a problem" situation.
I've done it, and it is not pretty. Or safe. And it is scary, believe me.
The "water" still contains some alcohol, so it is worth tipping it back into your fuel container - provided you are quite sure the flame is out!
When you are quite sure it is out, and the stove and the alcohol have cooled down, pour the excess fuel back into the bottle.
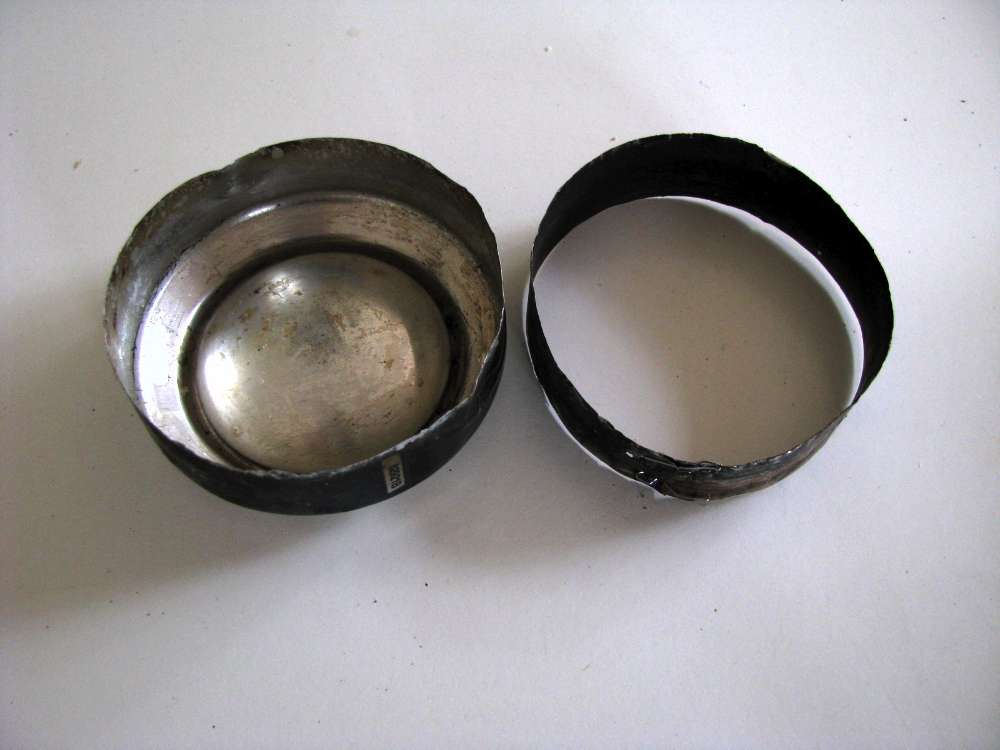
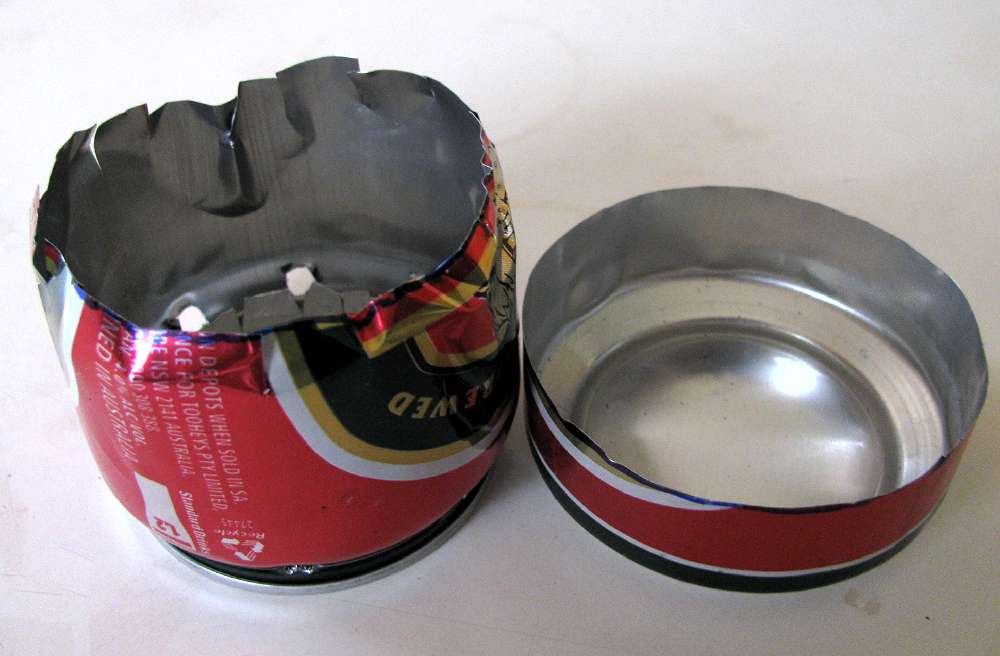
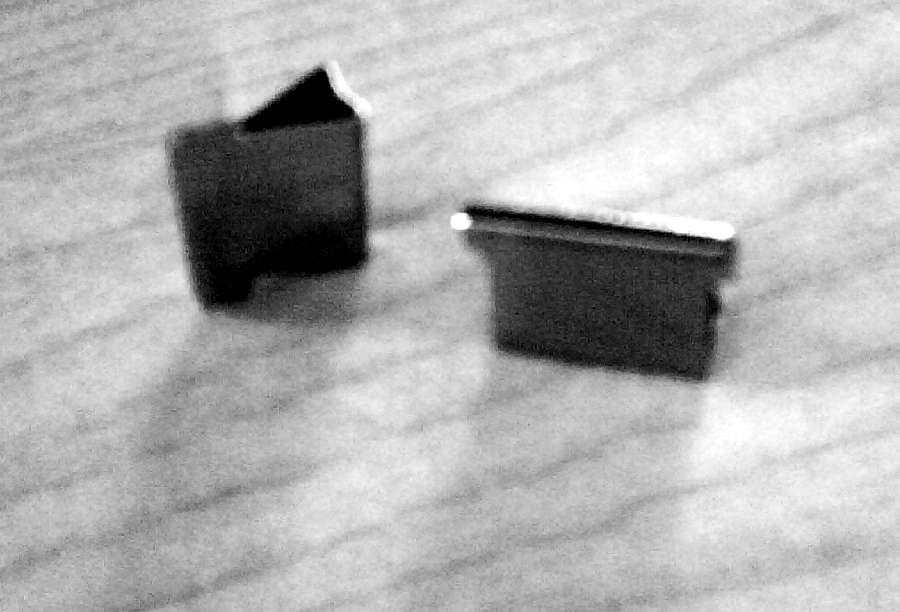
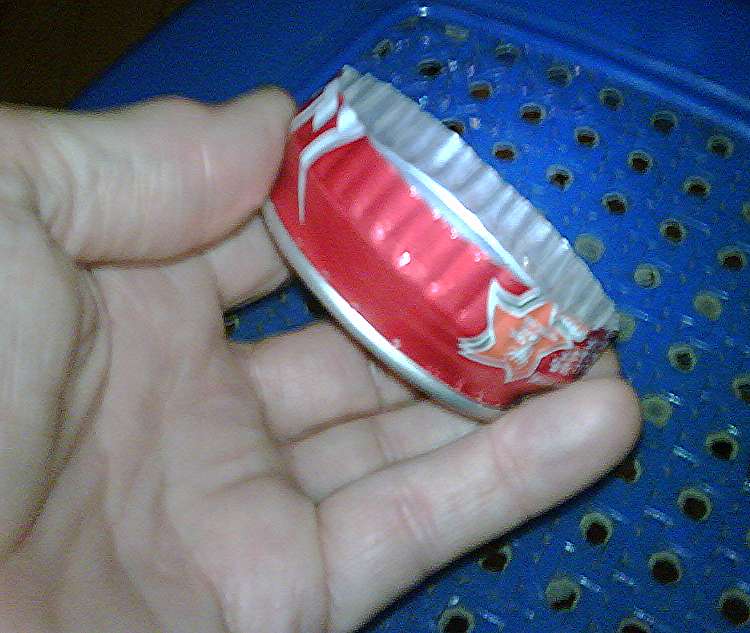
When you are finished the stove, make up a little cover for it by making another the same size, and cutting a "frill" of tabs around, as shown, and bend them back a little so the cover fits on the stove.
If the cover is the same size as the stove, as shown here, it will be hard to take off. Use kitchen scissors to cut it to about half the height of the stove, and you can then grasp both to pull them apart.
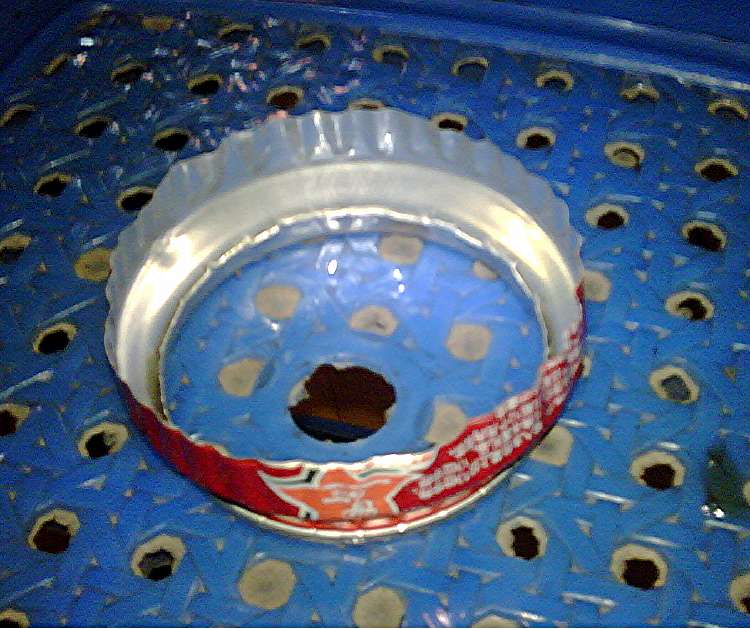
This stove is a couple of years old, still doing good service. It's the same one as that pictured at the top of the page, a little more battered with hard use.
Photo: Don Hitchcock January 2010
When you are finished, put a strip of sticky tape over the frills so they don't catch on anything.
I put it into a ziplock plastic bag, and it can then be thrown in your pack anywhere without coming apart. You might want to put a rubber band around the ziplock bag, and the stove is then close to bombproof.
Photo: Don Hitchcock January 2010
Making a Roundpod
These construction photos are for use with a stove with a height which is higher than the SS (Simple Stove). The roundpod for the SS should be about two inches, five cm high. The pot should be about one inch, or 2.5 cm, above the top of the one inch high SS for most efficient heating.

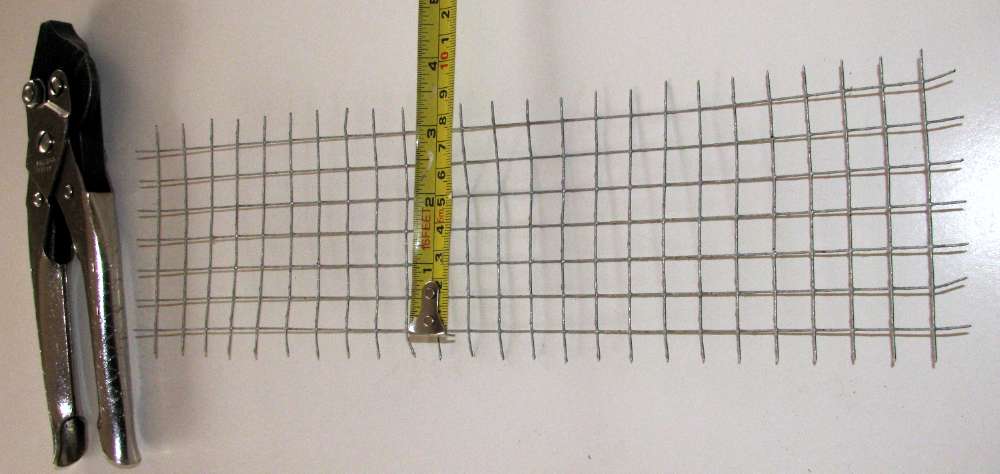
Cutting out the wire mesh. Leave the ends as shown, they will be bent down later. These dimensions are for a particular size pot, into which the roundpod fits neatly, which automatically means that the roundpod supports the pot in the most efficient way.
The height is for a particular stove, and should be changed for the SS (Simple Stove) so that the height is two inches, or five centimetres. If using a different stove or pot, you will need to change the dimensions accordingly.
Photo: Don Hitchcock January 2010

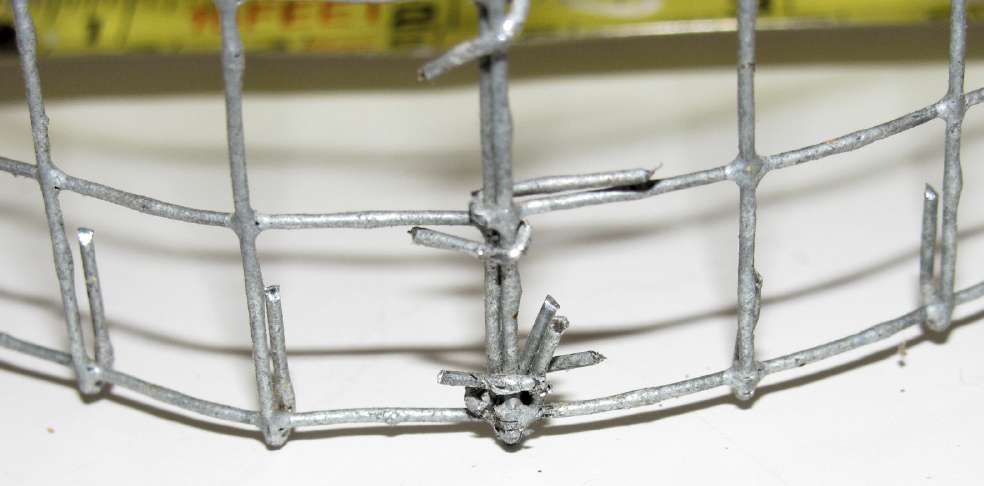
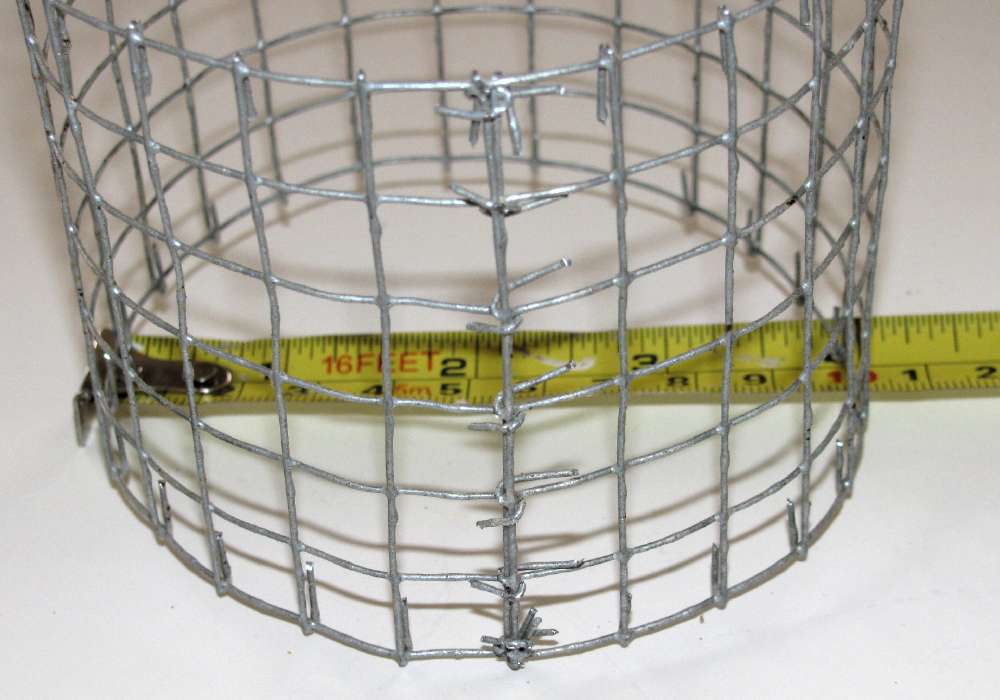
The completed roundpod, before adding the windshield. Note the way that the ends of the wires are bent over.
Bending over the ends of the wires makes the roundpod stronger, and also stops the cut ends catching on everything.
Photo: Don Hitchcock January 2010
Cut a strip from the side of a beer can for a windshield.
Photo: Don Hitchcock January 2010
Attach the windshield using staples, after cutting the aluminium rectangle to size. Make sure that each staple wraps around one of the vertical wires.
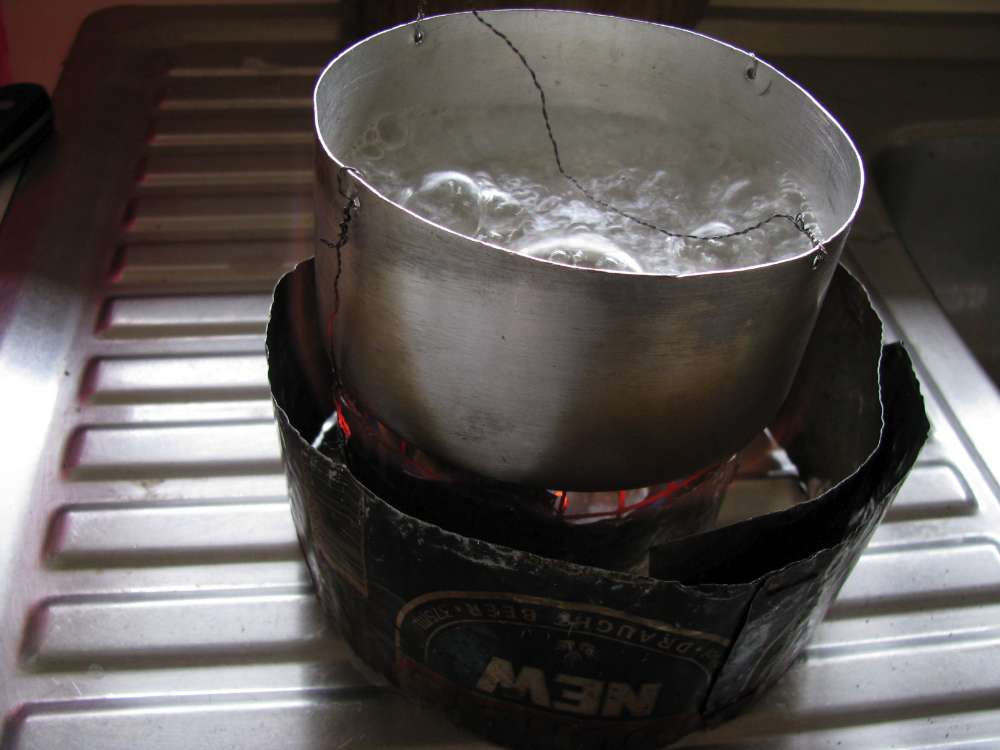
On the right is the roundpod specifically made for the one inch high SS stove. The stove version shown here uses a coil of four beer can sides slotted together, rather than stapled. Having lots of virtual wicks (three in this case) close together turns out not to increase the power of the stove significantly.
Photo: Don Hitchcock January 2010
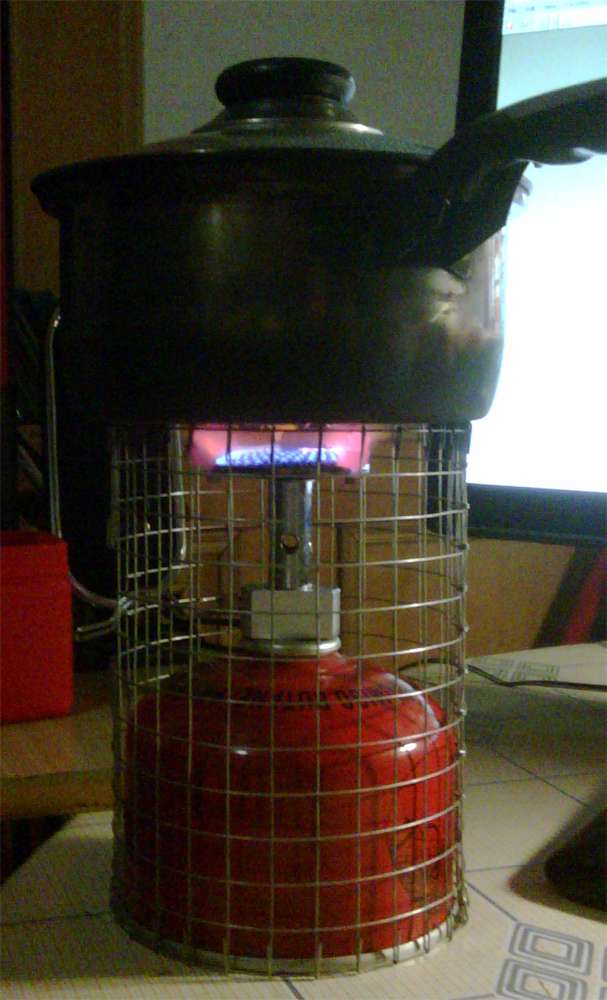
Ian MacLeod made this roundpod for a propane stove which had an unsatisfactory integral tripod above the burner.
Ian writes:
As for the support on this stove it consists of three little feet which can either flip out to support a pot or remain in for a smaller pot or beer tin. I don't like the feet as they are uneven and I hate sticking a coin on one of them to level out the pot. Hence, the roundpod. I cut a small hole in the roundpod and bent over the wires to give it a finished and non-threatening edge around the hole. Works a beauty!
Photo: Ian MacLeod March 2010
CAT stoves and the virtual wick
By the way, try your CAT stove with a virtual wick - it works a treat! The wick helps the flame to come out of the holes earlier than it would ordinarily. I thought I'd give it a try, and it meant that the pot could be put on the stove much faster, within a few seconds. Priming is very fast indeed.
But don't have the wick cover any of the holes. Have the wick come no more than half way up the holes on the bottom row of holes of the CAT stove. If it fully covers the first row of holes from the bottom you can get a spectacular (and dangerous if you are not ready for it!) fireworks display as little flaming droplets of alcohol spatter in all directions!
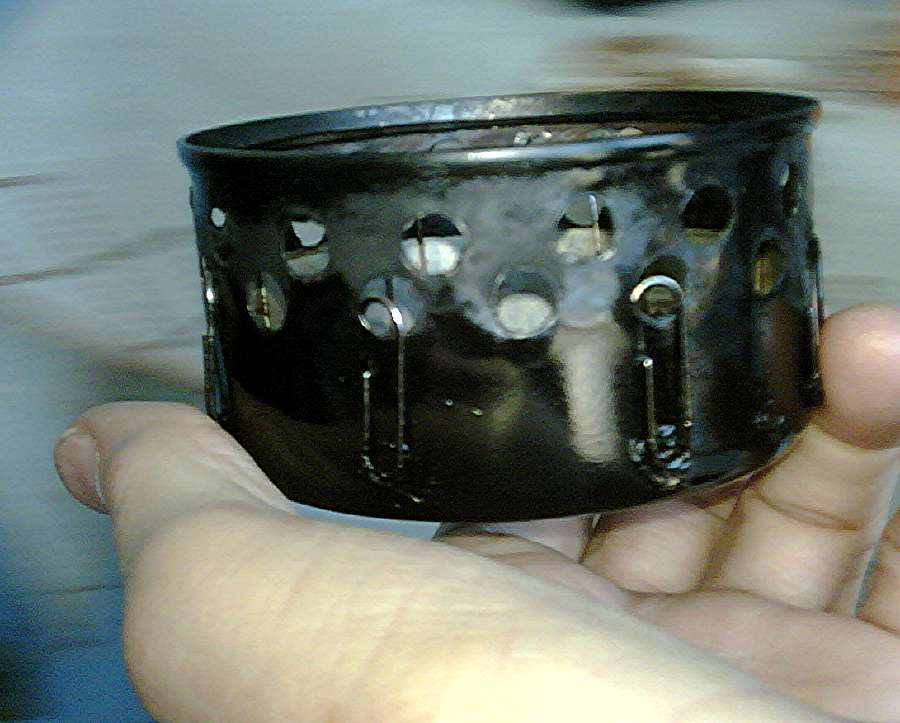
This is Ian's version of the CAT stove with virtual wick.
Photo: Ian MacLeod January 2010

If you don't secure the wick it tends to move up the can. Ian's method of using paperclips works well. Here is his CAT with virtual wick which he calls the Turbo Tuna Surprise in action under a pot of water.
Photo: Ian MacLeod January 2010
It is essential that the wick be a snug fit all the way round the inside of the CAT stove, and any other stove, for the wick to work.
It relies on there being a very narrow space between the two so that capillary action can carry the fuel up to the top of the wick/stove wall interface.
Again, Ian's paperclips do the trick for both securing the wick in position and keeping the wick hard up against the outer wall of the stove.
Ian's Data:
Turbo Tuna Surprise with 400ml of cool water and 18ml of 90% Isopropyl Alcohol.
Boil Time: 3:00 Burn Time: 5:00
Discovery of the virtual wick
I discovered the "virtual wick" concept when I made a press fit of the one inch standard cutoff of two cans, one inside the other, for a new design I was working on. Very tight press fit, as you can imagine! it is very difficult to do.
That is, the domed bottoms of both cans were visible top and bottom.
I had turned them so that the top can (the one I was about to make holes in) was **inside** the bottom one. (By the way, don't try it the other way round - the alcohol siphons up and over and out!!!!!)
I cut various holes and so on into the top, "inside can", a large central hole to fill it and light it from, and lots of tiny holes all the way around the outside of the top can, if you can picture that.
Thus, as maybe you have by now worked out, when I filled it with alcohol, the alcohol came up the gap, with a blue flame!
I swore greatly, that wasn't what I was after at all, the maximum flame should have been from the little holes. I filled the gap with metal cement to stop the flame coming up the gap.
Then I thought "Hey, wait a minute......!!!!!!!!!!!"
The penny dropped. I used the easiest possible method, the virtual wick I describe on this web page, and was pleased with the results.
The Airport Stove
I define an Airport Stove as one which you can construct in a few minutes with very basic tools and materials.
First, have a look at Ian Macleod's NastyCat. The Airport Stove is a shameless knockoff of his brilliant design.
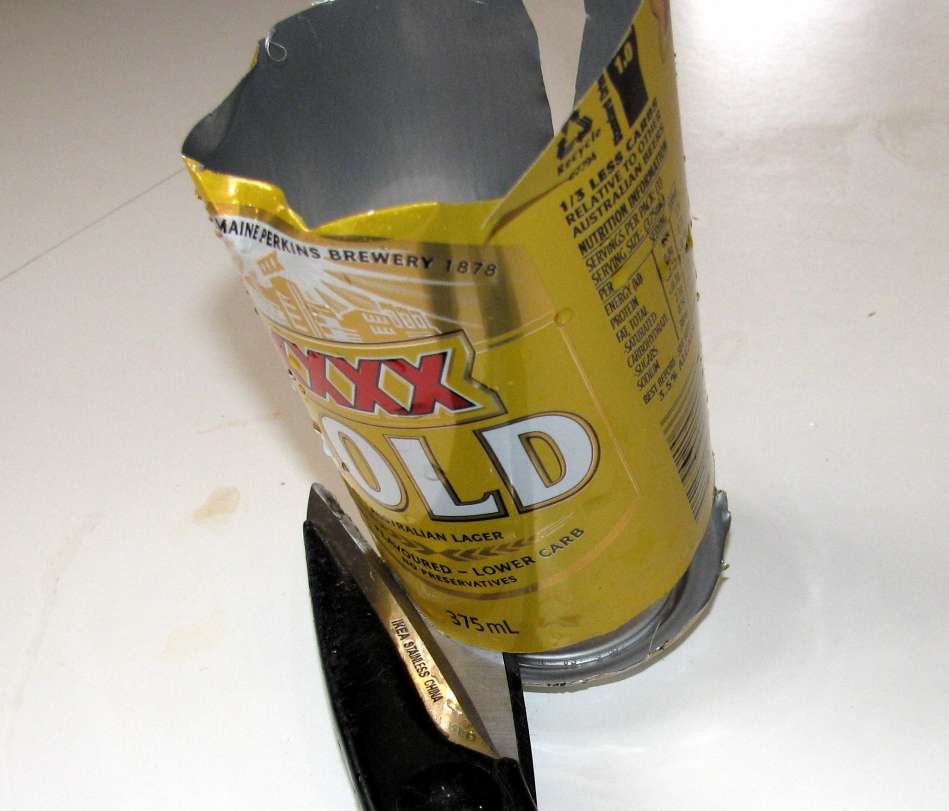
The airport stove is a simplified version of the Nasty Cat, designed so that with just a knife and a pair of scissors you can arrive at your destination, rescue an empty aluminium Coca Cola can from a trash can, and in a few minutes have not just a stove but a stand as well - and a stove that is very fast, this will boil a cup of water in two and a half minutes using 12 ml of alcohol.
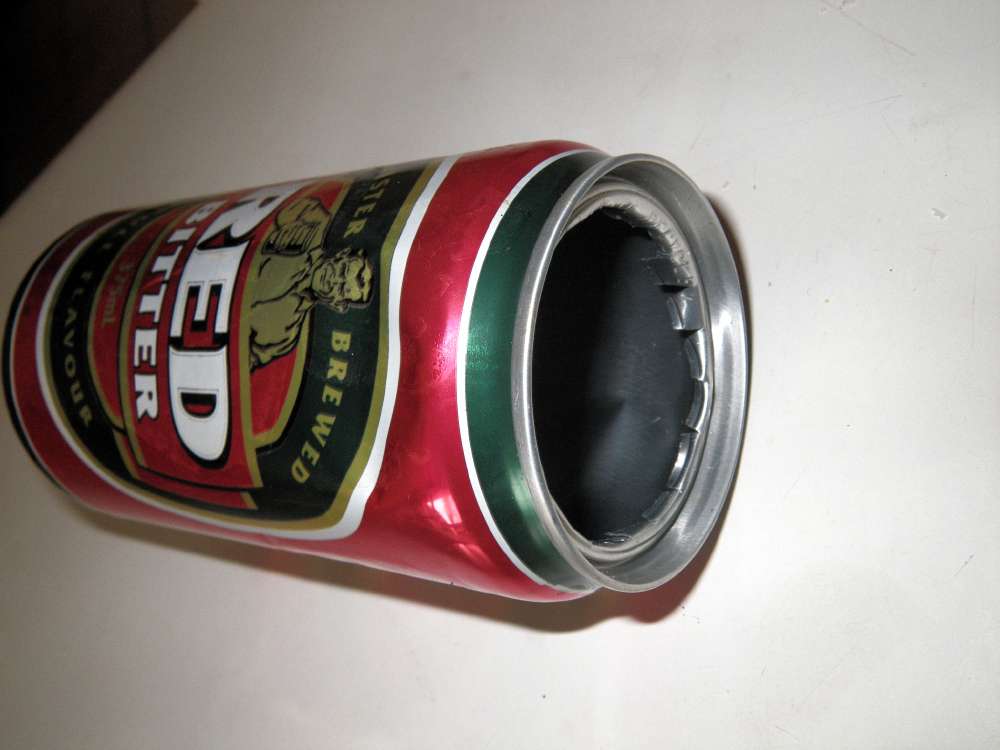
First, use the scissors to cut most of the top of the can out. Then cut radially back to the edge, leaving little tabs in a frill. Bend these over with the back of the scissors to neaten the job and open up the centre completely.
Photo: Don Hitchcock February 2010
My thumb is one inch wide, so I measured two thumb widths for the required two inches from the very top of the can, and used a felt tipped pen (a "sharpie") to draw a line around the can. I then cut along the line with scissors as shown.
Photo: Don Hitchcock February 2010

I then made small incisions with a sharp knife in eight equally spaced places. Just put a hole somewhere, put another on the other side, and keep halving the distance for the next hole. Take care, it is easy to slip and jab the knife in your hand. Keep the other hand out of the line of fire as much as possible, and take it easy.
I used a pen to open up the holes, making an approximately circular hole. Twisting the knife in the hole would have done much the same thing.
Photo: Don Hitchcock February 2010
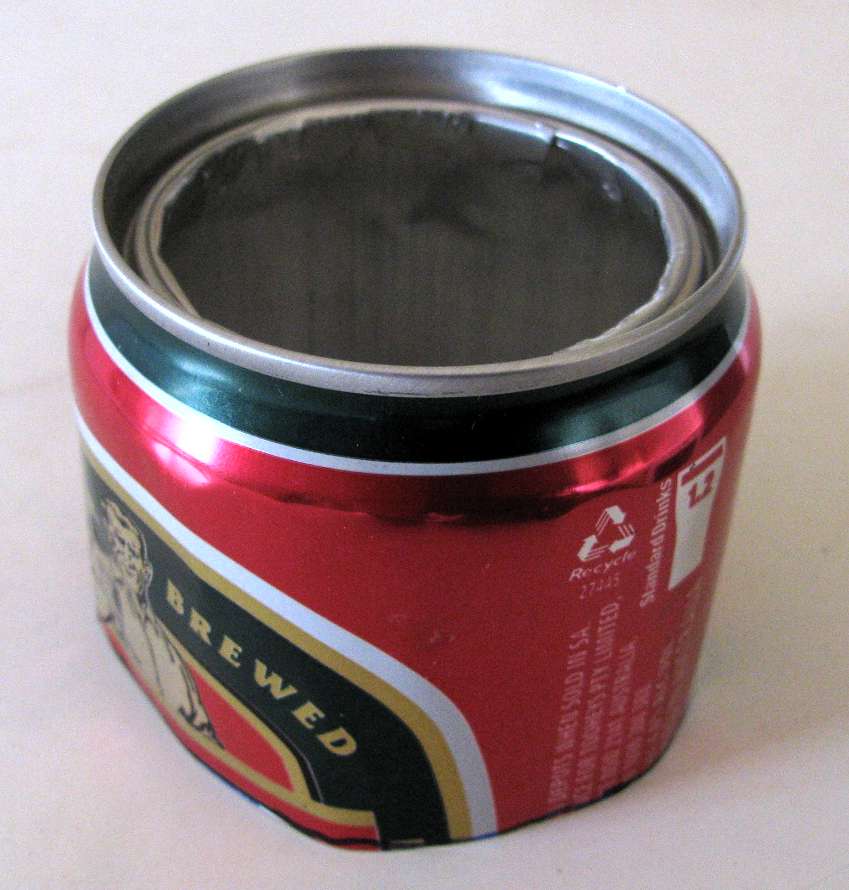
Measure one inch, or in my case one thumb width, from the bench top to the side of the can, on the base of the can. Draw a line around, one inch above the bench top, and cut out the base.
Now use the scissors to cut little tabs in the bottom of the top piece, and bend them over as shown, so that you can jam the top inside the base. There will almost certainly be one place where the can buckles in, this is normal, just try to keep the buckle as small as possible.
Photo: Don Hitchcock February 2010
Jam the top into the bottom, twisting as you go, making sure that there is nothing poking out over the base, and you are done. The advantage of this method is that the tabs push down on the shoulder of the base, giving strength, and there is automatically a virtual wick all the way round the stove, which improves the performance tremendously over the standard CAT stove, which this is a distant relative of.
The holes are necessary in order to make the lighting of the virtual wick take place very quickly. The holes don't seem to contribute much once the virtual wick is lit, which takes just a few seconds.
I stapled the top to the bottom just below the lip of the base in three equidistant positions, so that the stove did not fall apart in the pack, but it works fine without any securing method.
Photo: Don Hitchcock February 2010
Drop a match into the stove, the virtual wick lights with a little pop in a few seconds, then you can put your pot on top. I had turkish coffee in two and a half minutes on 12 ml of fuel.
Photo: Don Hitchcock February 2010
If you plan to use this in civilised areas, try to find a flat horizontal surface such as a concrete floor. If it is to be used on a hike, look for a flat rock, or clear a very horizontal area on the ground or on the sand beside a river. Do not try to use it sitting on grass - it is not stable enough for that.
There are two issues here - the stove has a very small footprint on the ground, and there is a very small area to support a pot.
These issues can be circumvented with a pot support created by following the same principle, that we might be restricted by both materials and tools in some situations.
Here is a pot support made with a wire coathanger, and twisted into shape with the hands.
Photo: Don Hitchcock February 2010
Obviously, if a method of cutting the wire is available, you would cut the coathanger hook off before starting, and straighten the wire, and use a vice or something similar to bend the coathanger at precise points. If those things are not available, this coathanger, while lacking a great deal in aesthetics, solves the stability problem, and gets you a cup of coffee.
Whatever it takes.
Photo: Don Hitchcock February 2010
A couple of bricks or some stones, or a couple of similar diameter fallen branches might also be pressed into use as a pot support, depending on what is available.
Feedback on the lightest alcohol stove and virtual wick
Received from Ian MacLeod:I saw your plans on the internet and, using a coca cola can bottom (In China these are not true aluminium as say, a beer can. They are an aluminium-steel alloy and a magnet will stick to them.) I took an aluminium strip from a beer can and put it inside as per your directions, only I have used two small stainless document clips: 180 degrees apart. They are small and I doubt they'll rust out soon.Further correspondence, Ian is as much a fan of alcohol stoves as I am!
This stove is amazing! I put it under a nice little stand, set a pot of water (1 litre at 48F and ambient air temperature of 15F) and fired it up. 6 minutes later ... rolling boil! Violent lid dancing handle jiggling boil! I proceeded to pour the water into my thermos, refilled it, and boiled it again! I got all 2 litres boiled up in about 11 or 12 minutes and the fire proceeded to heat up (but not boil) more water before it finally petered out at 15 minutes exactly! I put just enough alcohol (95%) in the bottom to cover the hump on the tin and when I made it I cut it to exactly 1" off the bench as you recommended.
The only other minus is that I can't call it my own design. The "virtual wick" idea of yours is golden! That's all, just thought I'd let you know that as a pretty experienced alcohol stove guy who's had his share of designs, explosions, fires, etc. This is a terrific stove. It and the CAT stove have made themselves my favourites.
- Summary:
- Boil time: 1 L 48F water ... 6 minutes hard boil.
- Burn time: 15 minutes.
- Fuel: 95% alcohol from the chemist
- Pluses:
- small, compact, lightweight, easy to light, no need for priming pan of any kind, simple construction, doesn't get any cheaper to build, burns a variety of fuels from 70% through 95% alcohol and just about any liquid that'll burn but isn't gasoline. low profile makes it easy to fit under a "borrowed" stove grate, long burn time, very high heat, quite resistant to a little wind.
- Minuses:
- It'd be pretty easy to crush this thing so it needs to be packed in a little container of its own. It doesn't look "cool" like some others but who cares?
My Coca Cola tin measures 65mm diameter as does yours. The only difference I can see is that we use an alloy of 35% aluminium ~ 55% steel ~ 10% tin. I did a little homework and the reason is that aluminium was originally used because its light weight saved on shipping costs, apparently enough to make the change. Aluminium is always more expensive than steel to manufacture. In China we have an extremely well advanced infrastructure and the most efficient and comprehensive rail system imaginable. With costs of shipping inconsequential ... we save by staying with steel. The inside of the can is coated in a polymer which burns off pretty quick when I make my first burn.
My cup is 25mm tall from the bench per your instructions. I did not sand the cup in any way but did take considerable time in 'softening' the edge so I wouldn't cut myself.
Here we buy pure alcohol. I buy 95% over the counter. I can buy methyl or ethyl alcohol and it cost me 5Yuan (about a dollar Aussie) for a 500ml bottle. It really does burn hot. I have used 70% but have not timed it. 70% is 4.5Yuan which is just too close in price for me to bother.
I can only think of one thing (Ian's stove has better performance than mine) It may be that I have anchored the "wick" at two locations with clips 180 degrees apart.
Here's what I did:
a. I cut off the bottom of the tin at 1" from the tabletop using a jig I made from a boxcutter and a dictionary. I scored the tin till my hands hurt and then simply pulled the tin bottom off. I took a few moments with #200 sandpaper to smooth the edge a little, but not round it.
b. I cut two strips of aluminium from the side of a beer can (Budweiser 350ml, standard tin). I made the cuts as exact and precise as possible using a metal rule and a razor cutter against a wooden cutting board.
c. I inserted the strips "wick" into the tin allowing the natural curvature to press them against the tin walls. Here I used tiny slit cuts with scissors so that I could join the two pieces of aluminium together without any glue or staples, etc. Precision is important here because when the strip goes in it needs to "find its own home" against the walls of the Coke Tin bottom. I made sure the "wick" is ever so slightly below the outside wall of the Coke Tin. I believe that this small difference allows the wick a chance to better distribute heated vapour.
d. I used these tiny (stainless steel) clips which are used for holding a few pieces of paper together and slipped on near a "slit joint" which holds the pieces of aluminium together and the other I slipped on 180 degrees away from the first making them symmetrical and good looking too.
e. When I pour enough 90% to just cover the hump that's what I use. Perhaps my hump on the bottom is deeper. Let me measure the alcohol quantity ... stand by ... 19ml. There ya have it ... 19ml of alcohol. I could probably put 25ml in if I tried, but this works well for me.
I put the water 3cm from the pot bottom and used a lid on the pot. Interesting is that it's a steel pot and I wonder if I might have gotten a better boil time with aluminium. Hmmm. The pot measures 13cm across the bottom by 7cm high and is a stainless alloy.
f. I started the fire with a match, put the pot directly on the stand (cast iron raised burner grate borrowed from the wife's kitchen stove). At 5:58 it was a roiling boil with the glass lid on. It actually began to soft boil around 4:30. I got an exact 15:00 burn time.
g. I smiled.
I noticed that the virtual wick has formed itself nicely and I just won't even worry about it anymore. As the clips may well be stainless steel I don't think I'll see any rust issue there.
I have used a tuna fish tin (the kind with the peel off top) measuring 85mm by 40mm high. It's made of steel (what a surprise!) as aluminium food tins are unheard of here. I put a virtual wick inside which is identical to that in the above Coca Cola stove and it extends from the bottom of the tin to 1cm from the top. I made slit joints as with the one above but there is no way to clip it into place because of a subtle lip on the tin. No worries! When it gets cooking it develops a really neat blue "halo" between the tin lip and the bottom of the warmed pan.
Specs: 1L cool water from the tap heated to a rolling boil in 7:12. This unit gave me a 31:00 burntime which is so cool! Now, this is not an alloy but a steel tin. Even the top is steel alloy (I tested with a magnet) as it seems everywhere in China.
I leave the wick just a little below the top of the outer wall: 1mm below the outer wall on the Coke tin and 1cm on this tuna fish tin.
I LOVE YOUR WICKING CONCEPT AND HAVE ONLY BEGUN TO EXPERIMENT!
Some photos of Ian's set up:

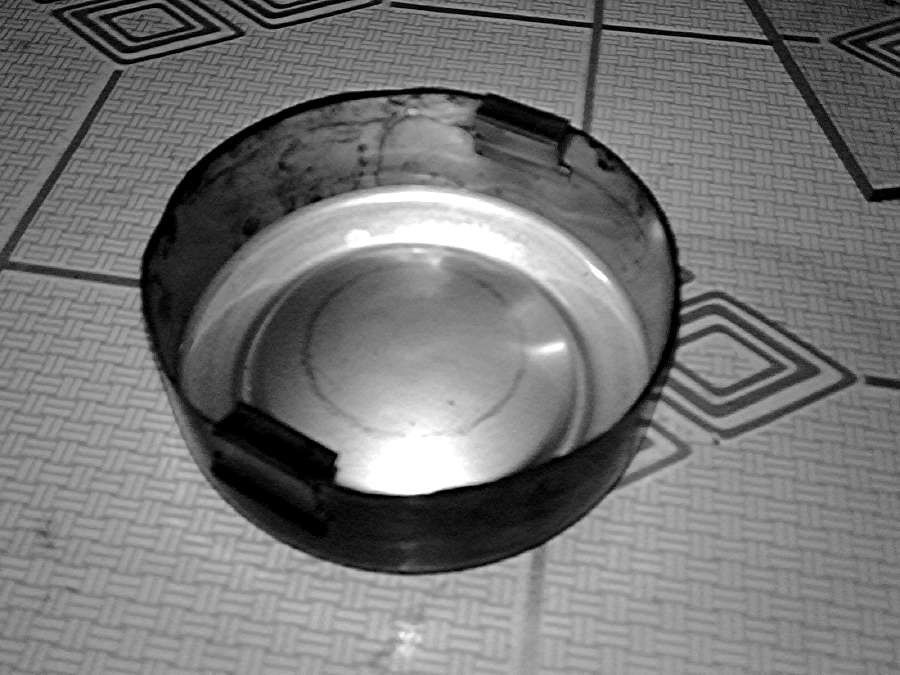
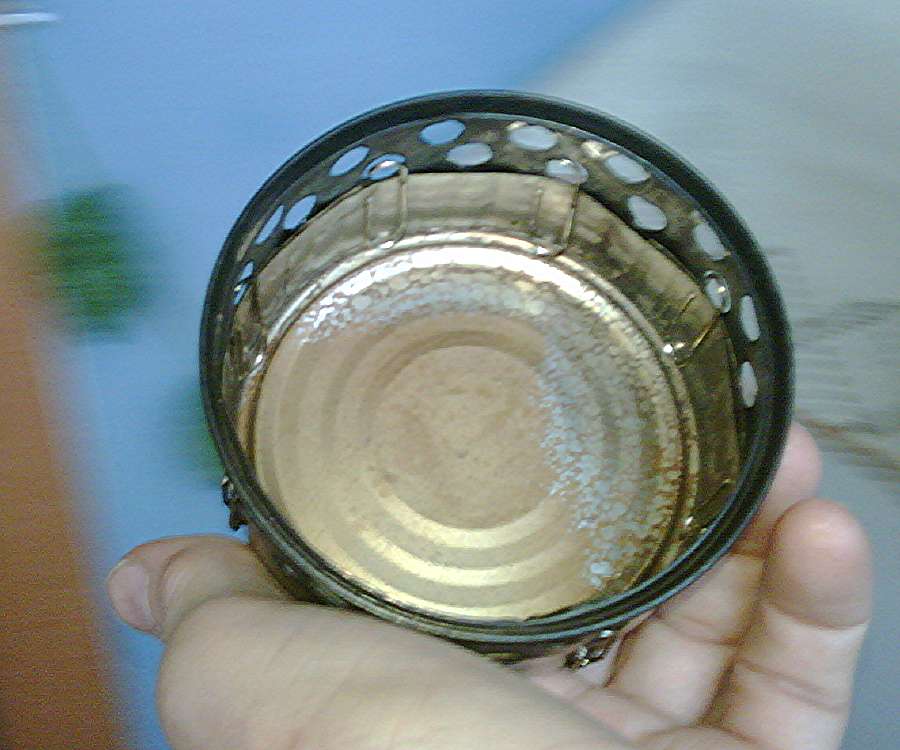
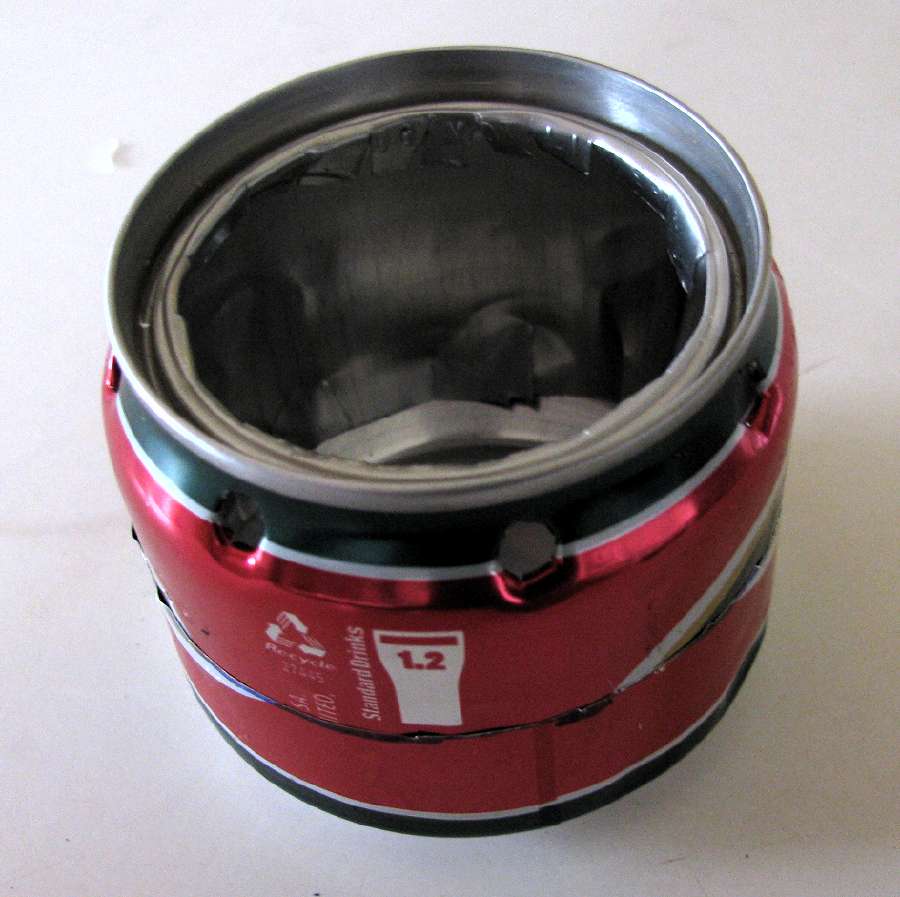
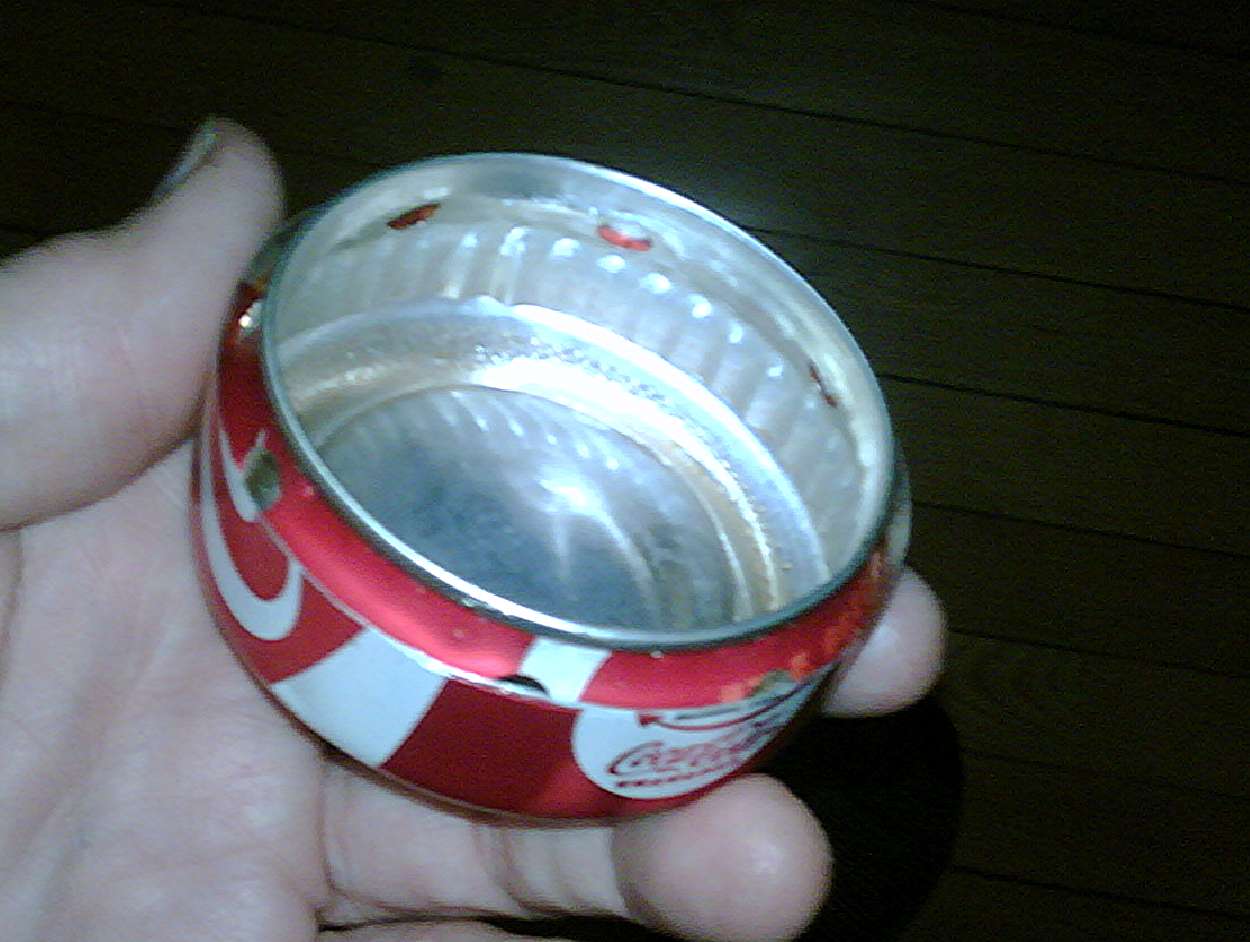
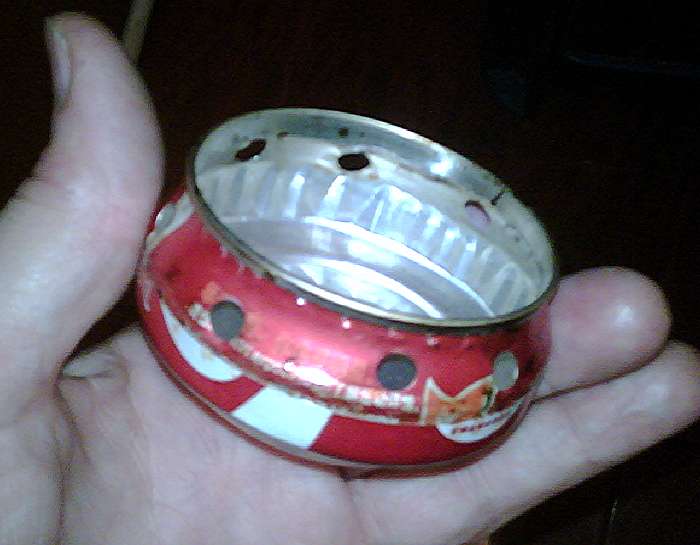
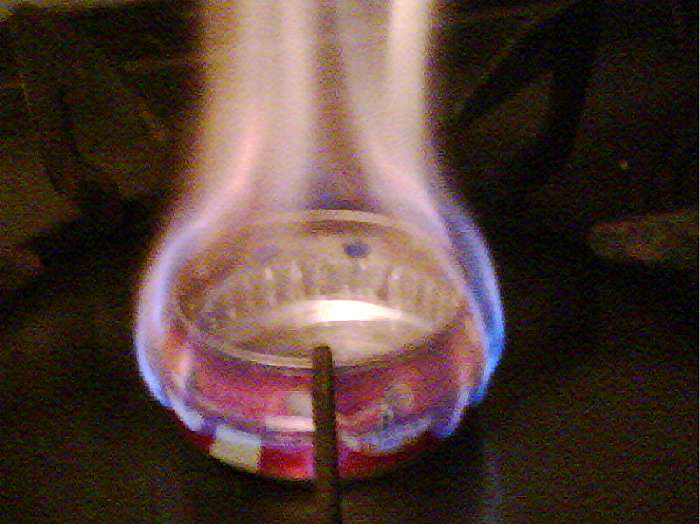
These images show the stove and the paper clips used by Ian in his version of the stove and the virtual wick.
Photo: Ian MacLeod January 2010

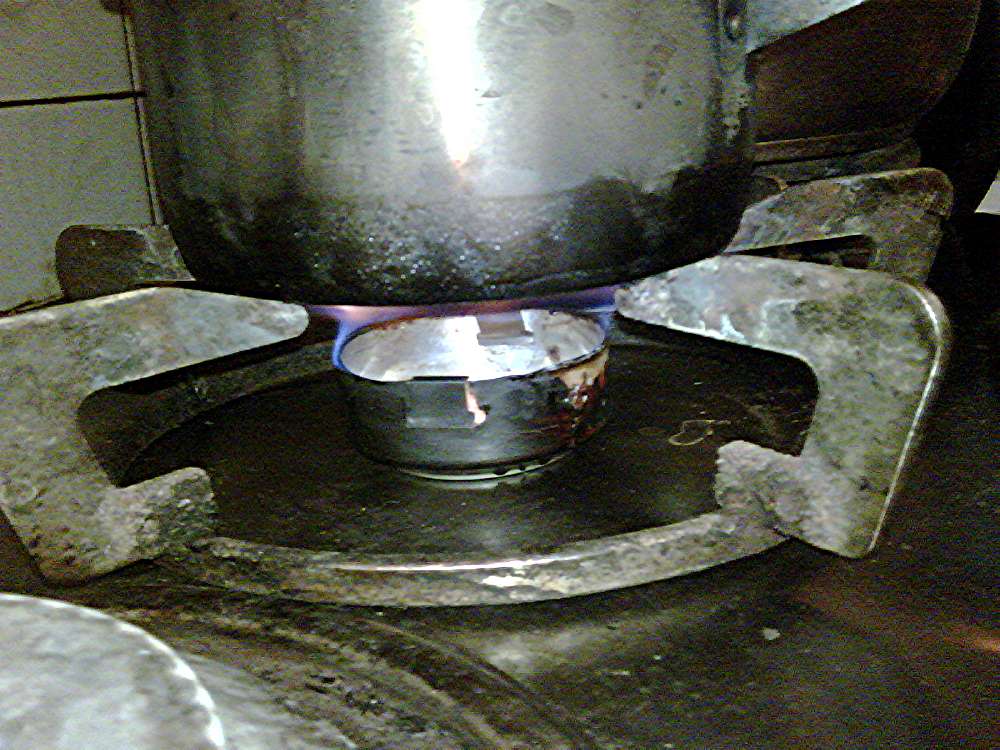
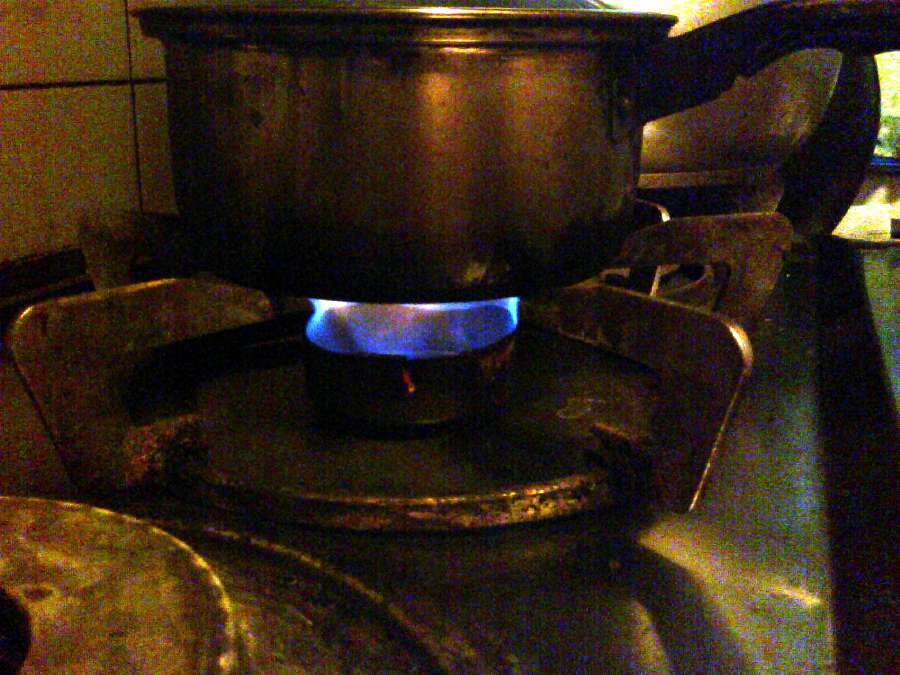
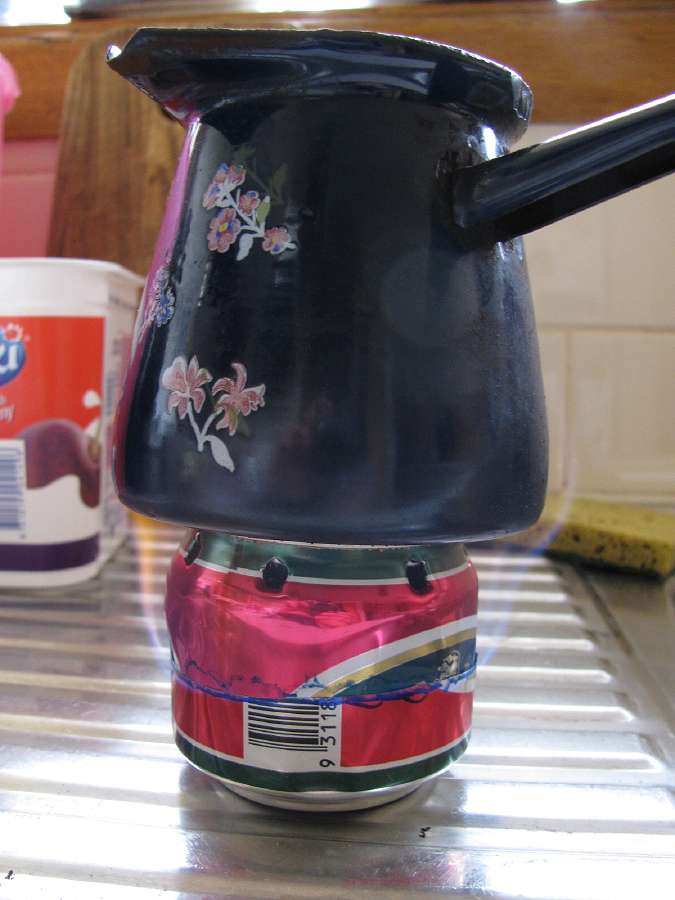
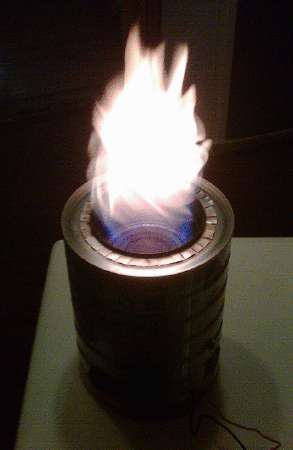
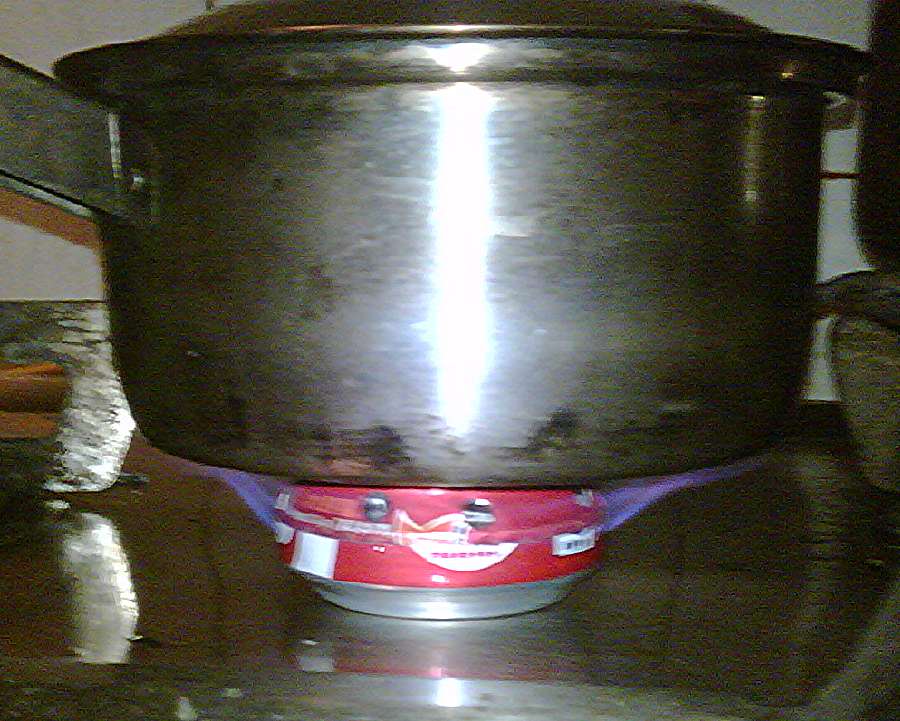
These images show the stove in action.
Photo: Ian MacLeod January 2010
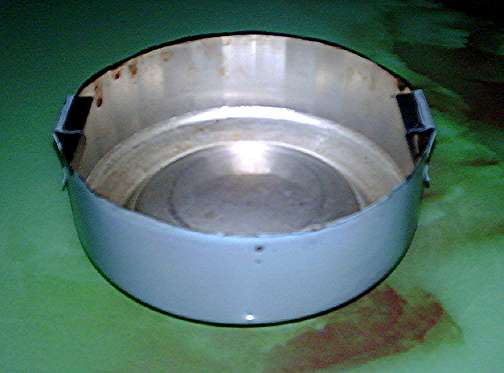
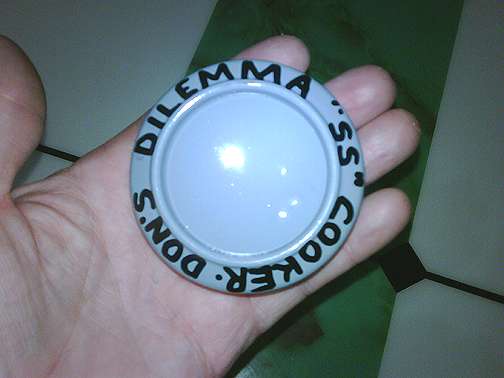
The base of this version of the SS, known also as "Don's Dilemma" has been painted with high temperature enamel, and labelled.
Photo: Ian MacLeod January 2010
More stoves from Ian's collection
More Feedback on the Virtual Wick
The Pilgrim Stove
Steve Romer writes:I love the idea of the Virtual Wick. I decided to try it myself. In the process I made a mistake which turned into a very useful improvement, I call it the Pilgrim Stove because our family name means Pilgrim.

I thought the wick was a continuous ring cut from the can.
So I cut my wick from the section of the can (Fosters Beer) immediately above the bottom.
Photo: Steve Romer September 2010
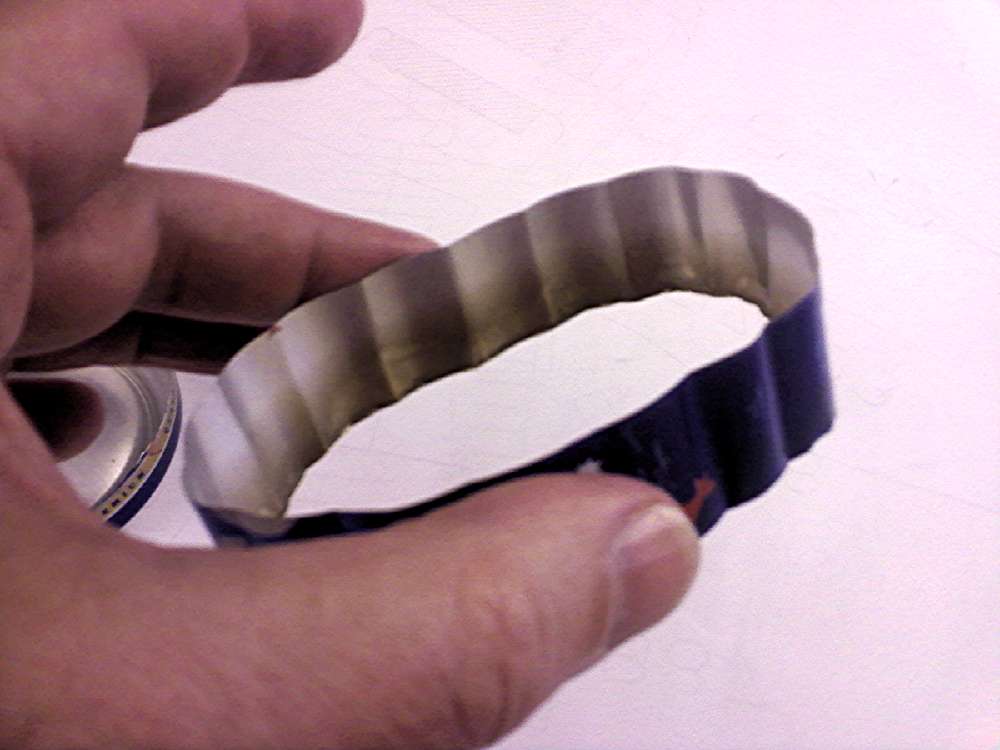
I couldn’t figure out how to get it to slip inside the can bottom, so I made a few crimps in it. I wound up making a lot of crimps in it.
Photo: Steve Romer September 2010
All those crimps made it easy to bend and slip inside the can bottom. This shows the wick with a bend in it before popping it into place.
Photo: Steve Romer September 2010
Then it was a simple matter of pushing the wick into place against the wall of the can bottom.
Photo: Steve Romer September 2010
It made a nice, snug fit with no need of staples or paperclips. The wick and the can bottom are the same height, which means the top of the wick is about one quarter inch above the top of the can bottom. That turned the stove into a Pressurized Side Wall Jet stove. I put 4 tablespoons of 97% Isopropyl alcohol in the stove and lit it up. The ring at the wick caught fire almost immediately. I put 2 cups of water in a tea kettle. I set it directly on the wick. In about 2 minutes the kettle was whistling. When I put out the fire, there was about 2 tablespoons of alcohol left to burn.
Using the Fosters can made quite a large flame spread that licked up the sides of the tea kettle. Probably way too big for a 1 quart back packing pot. I’m going to try it with a regular soft drink can.
The Pilgrim Stove - Instructions using a 12 oz drink can
Cut the bottom off of a standard 12 oz. soft drink can. It should be one inch tall. From the same can, cut a second ring of metal, also 1 inch tall.
Photo: Steve Romer September 2010

Make at least 16 crimps in the second ring. These crimps shorten the diameter of the ring just enough that it will fit snug against the wall of the can bottom. Be careful not to bend the crimp too much, as that might cause the metal to break.
Photo: Steve Romer September 2010
With one hand you can insert the second ring into the can bottom.
Photo: Steve Romer September 2010
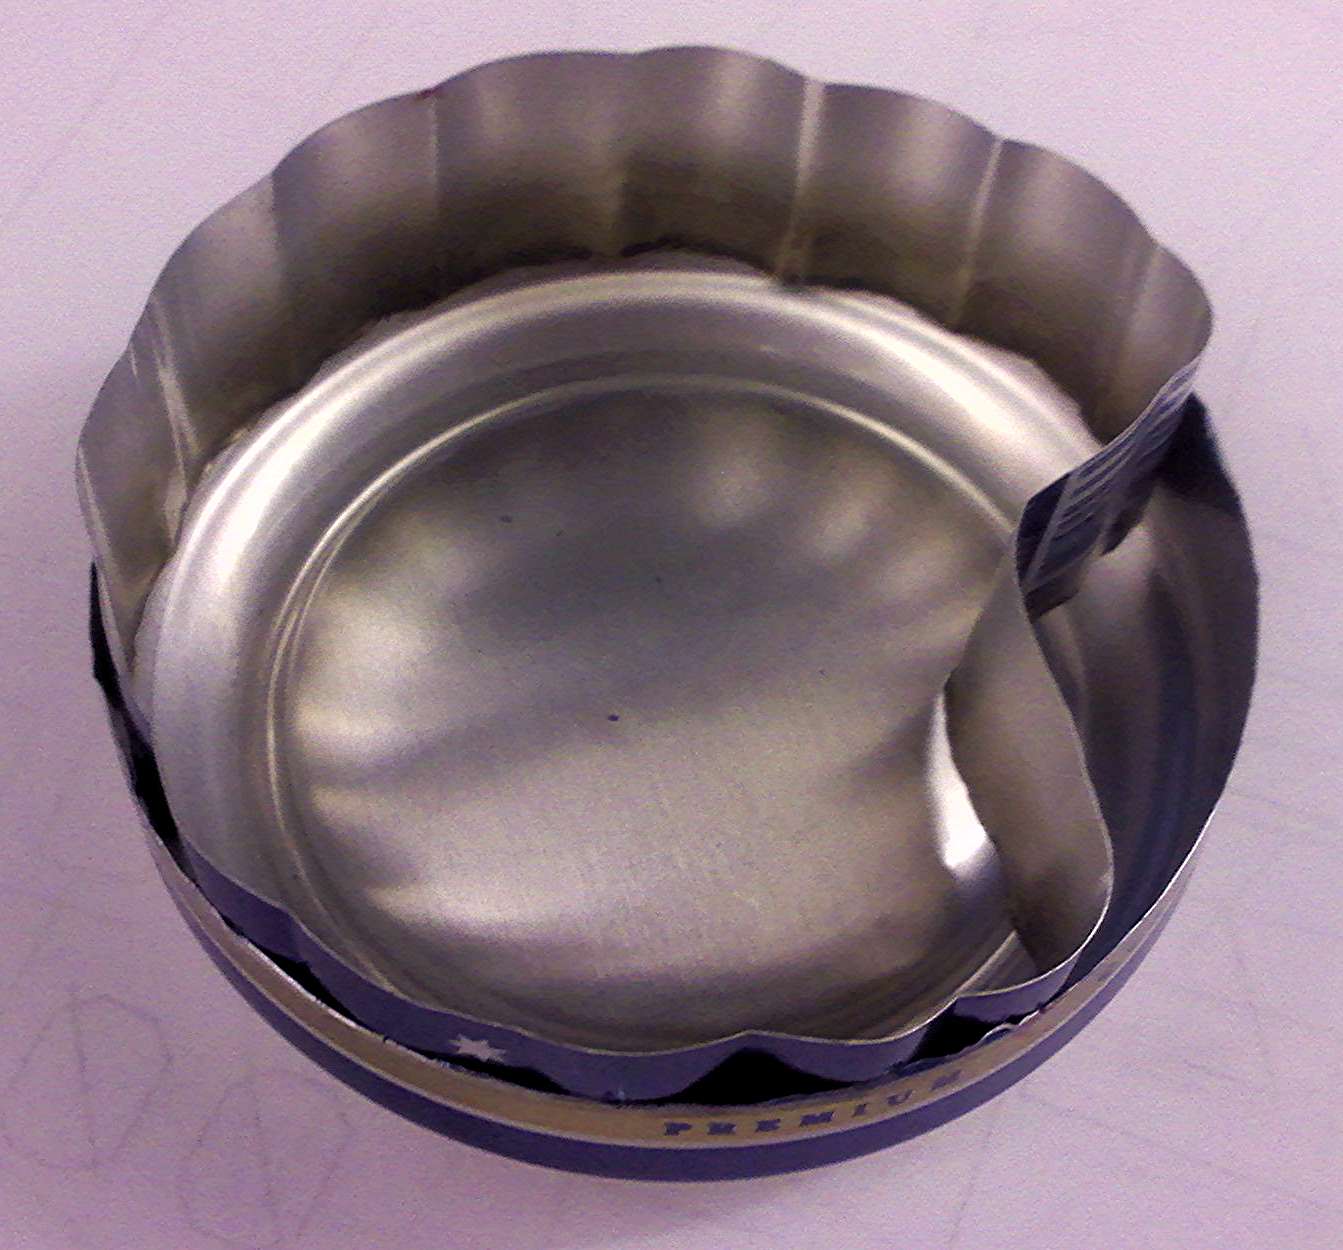
When you release it, the ring will pop in place almost completely.
Photo: Steve Romer September 2010

Gently press the remaining portion of the ring up against the wall of the can bottom.
Then gently press down on the ring so that it sits entirely on the shoulder of the can bottom.
The stove is now assembled.
Photo: Steve Romer September 2010
Pour 2-3 tablespoons of alcohol into the stove and light it. The fuel immediately will begin to burn around the top of the stove and down the edge to the top of the outer wall.
Photo: Steve Romer September 2010
Immediately put the pot on top of the stove. It will burn like a pressurized side jet stove.
In about 2 minutes it will boil 2 cups of water using about 2 tablespoons of Isopropyl alcohol.
Note that although Methanol can be used, it takes longer to boil the water, but there is no black soot to clean up either.
Photo: Steve Romer September 2010
Virtual Wick Variations
In its simplest form, the virtual wick is a strip of metal held as closely as possible to the inside of the stove, up which alcohol is transported to the stove perimeter by capillary action.
In the case of a beer can, however, there is a problem. The sides don't meet the base at a right angle, there is a sloping section to a gutter which is a rim on the outside, which the beer can sits stably on. Then there is a dome shape to the centre of the base of the can.
This means that towards the end of the burn, I doubt that the wick is doing much wicking. By that time it doesn't matter a great deal, I suppose, because the stove has reached a good heat, and the alcohol is bubbling away, so there is plenty of fuel getting to the flame.
But I thought I'd check.
I first tried using a sharp knife to cut off the dome of the base, leaving the sloping side. This seemed to distort the base quite a bit, so I decided to try better technology.
Photo: Don Hitchcock January 2010
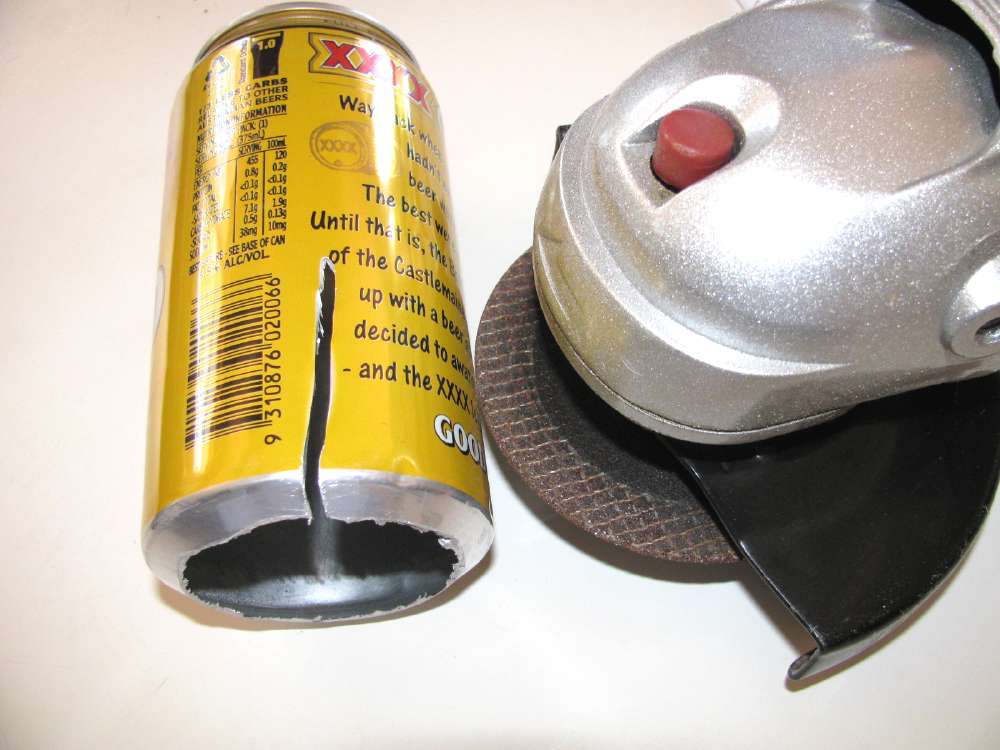
An angle grinder turned out to work very well. I also used it to cut a vertical slot so that the virtual wick would fit inside the beer can.
Photo: Don Hitchcock January 2010

The new virtual wick fitted quite well inside the beer can, and the slot was just the right size to twist the edges slightly, crossing in the middle, so that the whole wick pushed against itself to hold the wick tight against the side of the stove. No other retaining method was necessary.
Photo: Don Hitchcock January 2010

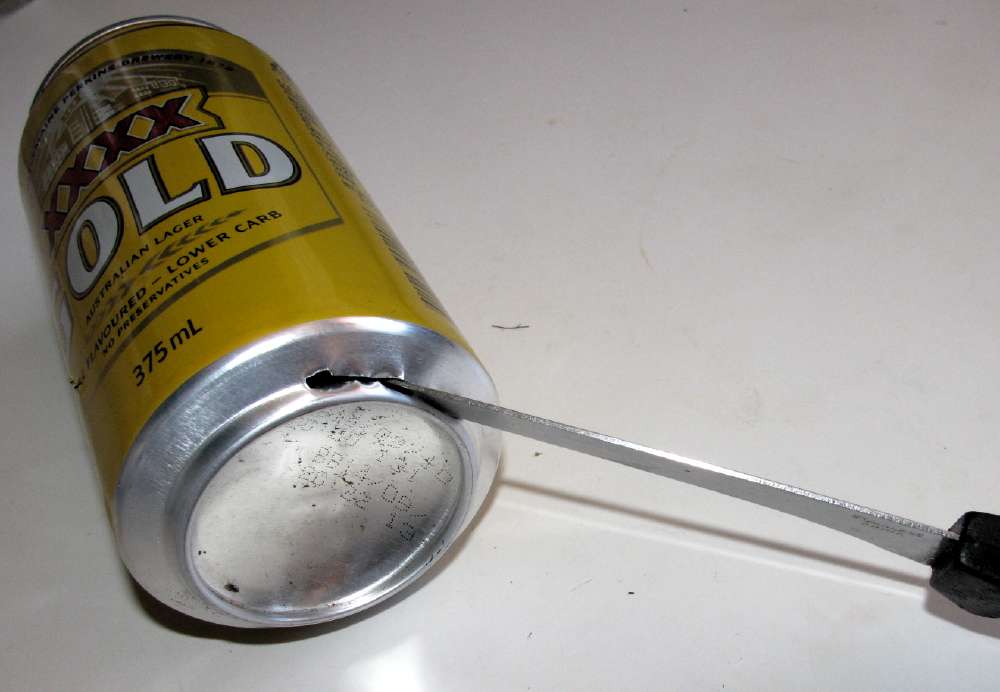
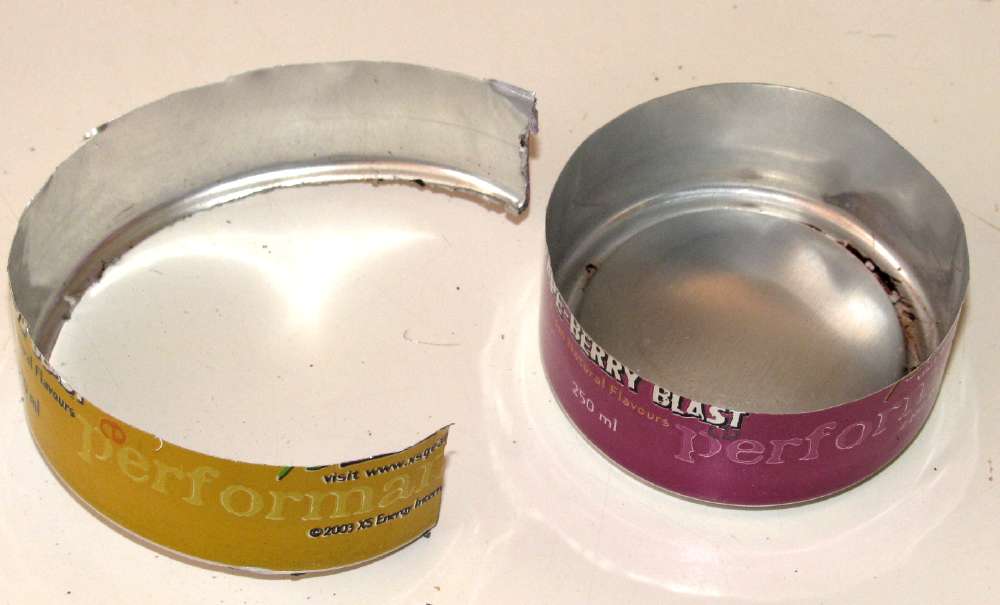
It is sometimes good to have a stove which does not put out as much heat. Normally I just add a bit of water to the alcohol, which works well, but there are smaller cans available here for sports drinks which are 5 cm across instead of the 6.5 cm of a beer can. This gives the beer can about 30% extra rim length than the smaller can, and it is the length of flame available that determines the power of the stove in this situation.
Note the quite different shape of the can base. There is very little sloping from the side of the can to the rim around the base that the can sits on.
Photo: Don Hitchcock January 2010

The base came off quite easily. The angle grinder is held parallel to the base, you are essentially cutting off the rim, which allows the base to drop off, rather than digging into the base as you would if you were going to use a knife to cut off the base.
Photo: Don Hitchcock January 2010
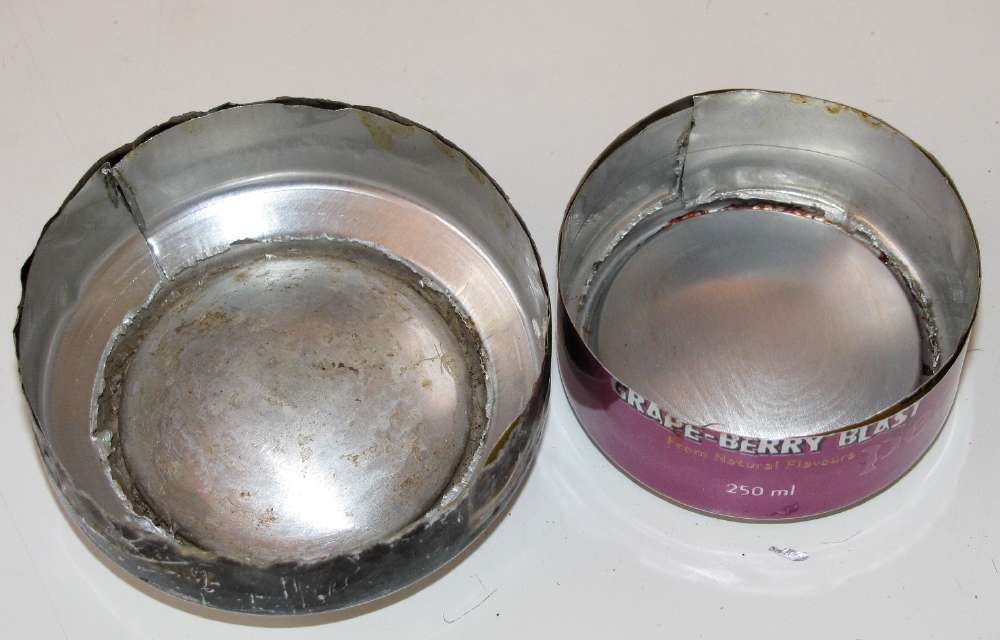
The wick fits reasonably well, but not as snugly as the beer can. For the smaller can, you might be just as well off with a simple flat wick, the shoulder or sloping part is not very large in any case, and a simple flat strip would probably fit better.
Photo: Don Hitchcock January 2010
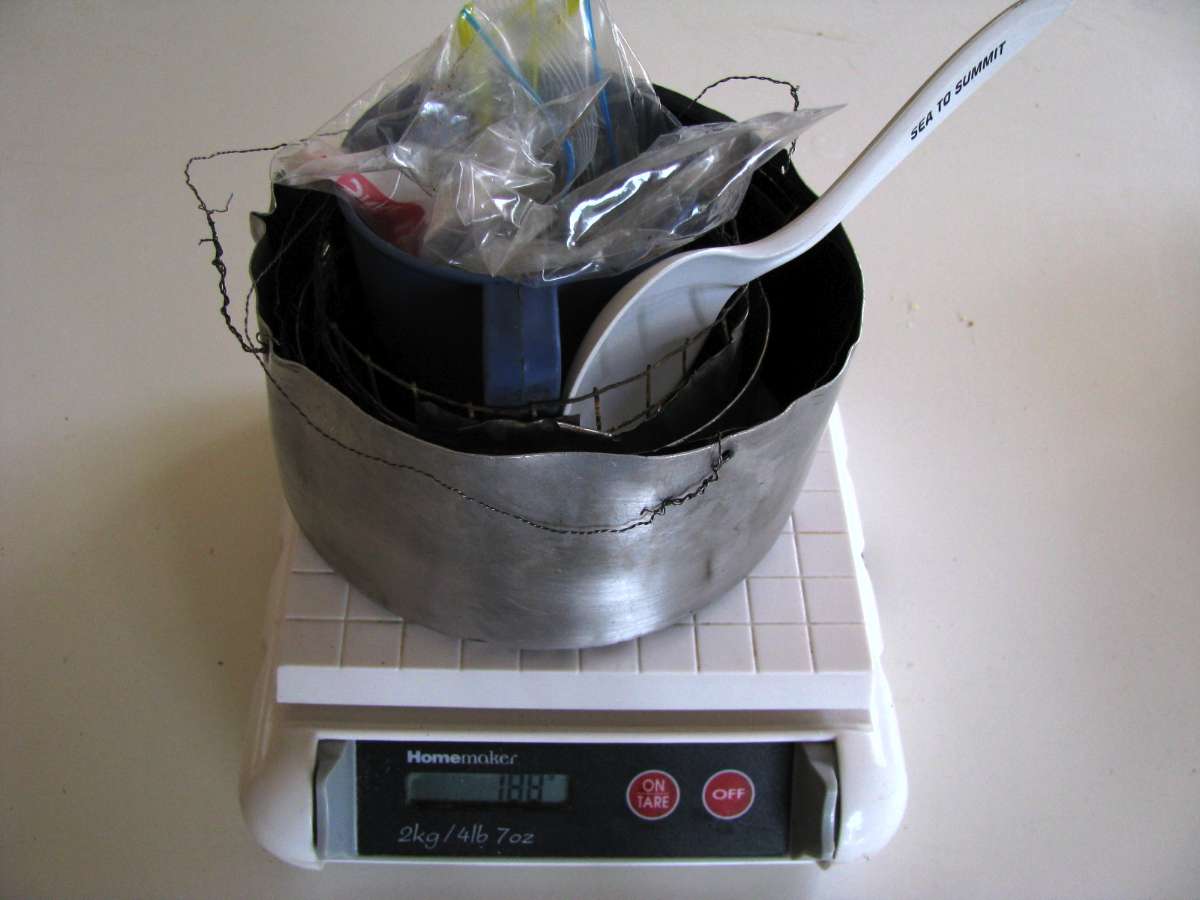

This is my complete cooking set, weighing a total of 188 grams, including two billies, a roundpod pot support, a stove, a cup, a windshield and a spoon.
Everything nests inside something else, apart from the spoon. Volume is almost as important as weight, since that means you can have a smaller backpack.
Photo: Don Hitchcock January 2009
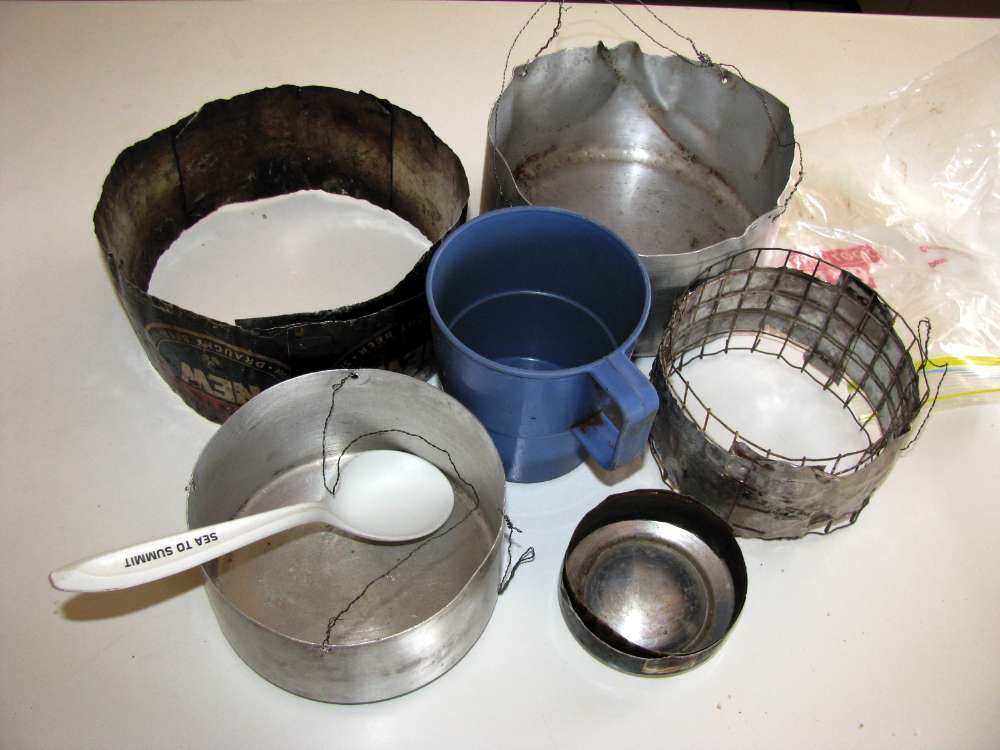
Most of my stove use involves boiling no more than a cup of water at a time.
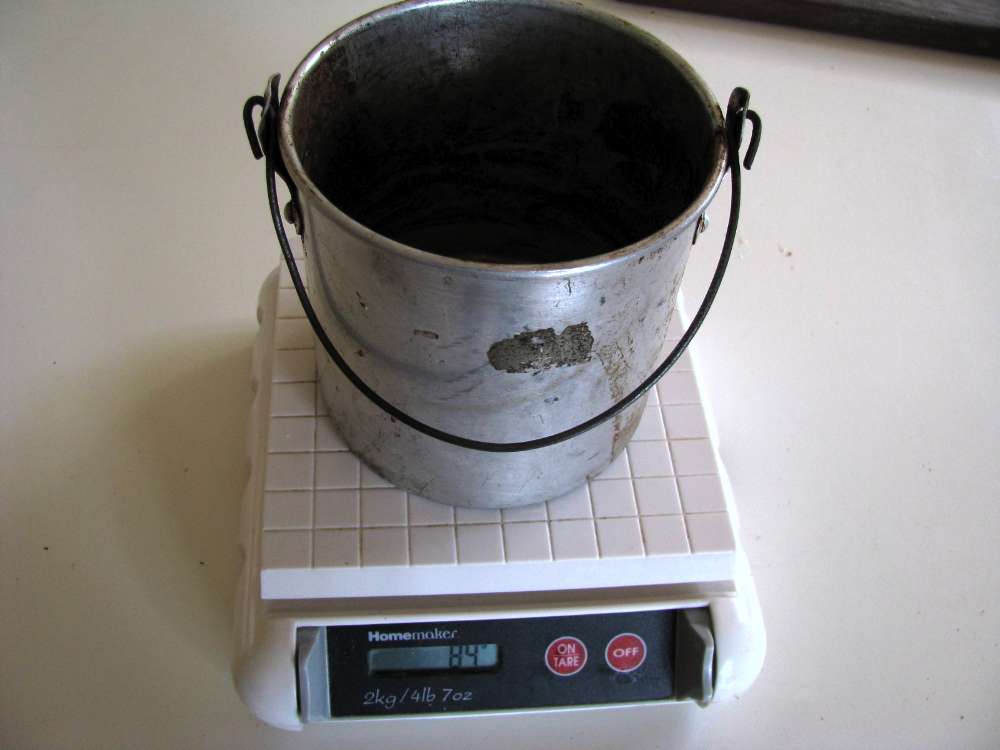
The original aluminium billy on the left weighs 84 grams, but after surgery it comes down to half that, 42 grams. The wire bail is made from stainless steel wire from a stainless steel wire mesh kitchen strainer, pulled apart (cut the mesh down the centre with kitchen scissors) and with two wires twisted together. There is another similar wire passing under the pot, with a handle on each side, so that you can easily tip the coffee into your cup. It holds 350 ml, which is plenty for boiling my turkish coffee, including 200 ml of water and space for the froth to rise!
Apart from lightness, the thin wire cools very rapidly, allowing you to take hold of it much more easily than the original thick wire bail.
Photo: Don Hitchcock January 2009
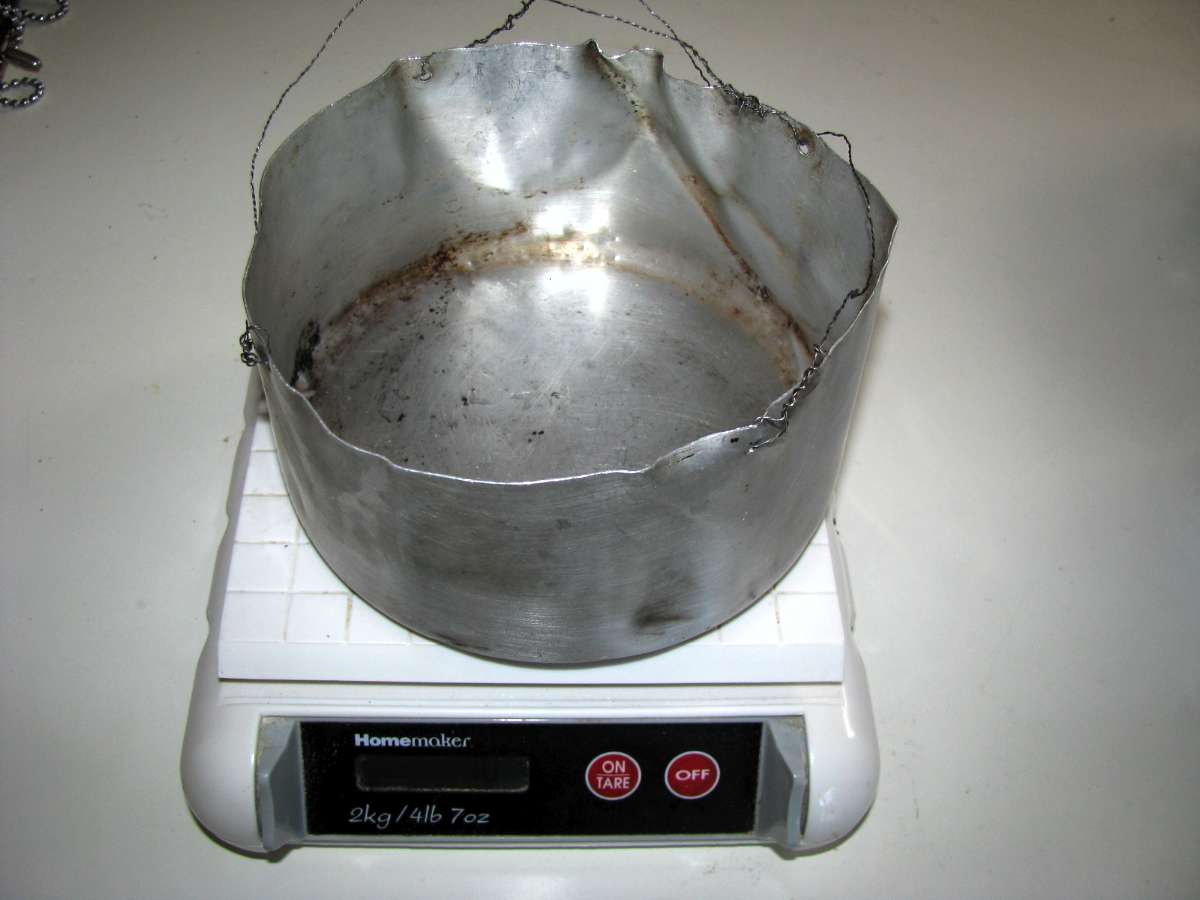
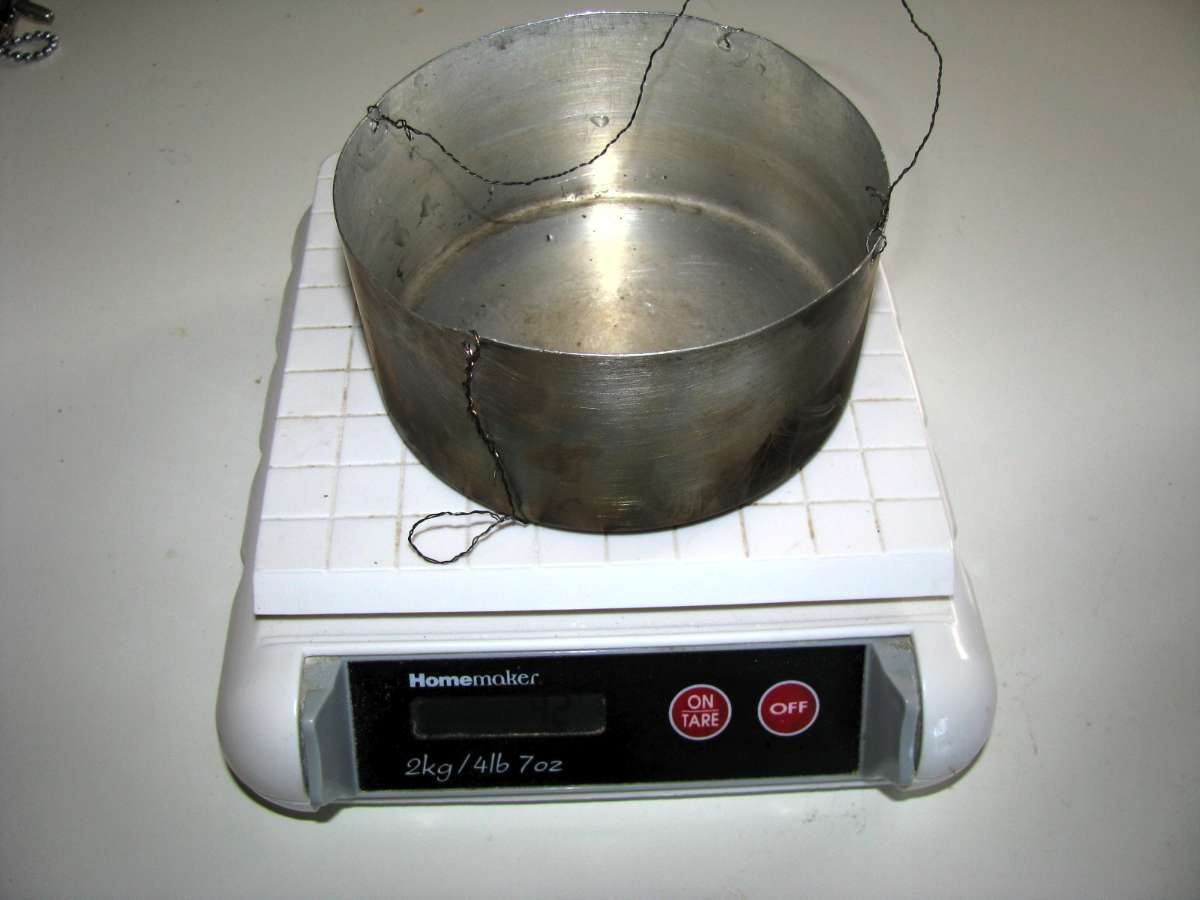
This larger, meal size container is half the size of the original larger billy and half the weight. It now weighs 70 gm and holds 900 ml, which is plenty for my evening meal. It has had a hard life, and was stepped on one trip, but still works well. I use two bails for stability because of the greater weight it carries. The bails need to be long enough that they fold down either side of the billy, out of the way when you take the pot off the fire and eat your meal from the pot.
When cooking a meal, do not attempt to stir it while it is on the roundpod. Take the billy off the roundpod, put it on the ground, stir it, then put it back. You won't listen, or follow my advice, I know that, but when you tip your meal out on the ground when stirring too vigorously, you may say to yourself "Yikes! Don was right!" and do it the correct way next time.
Photo: Don Hitchcock January 2009
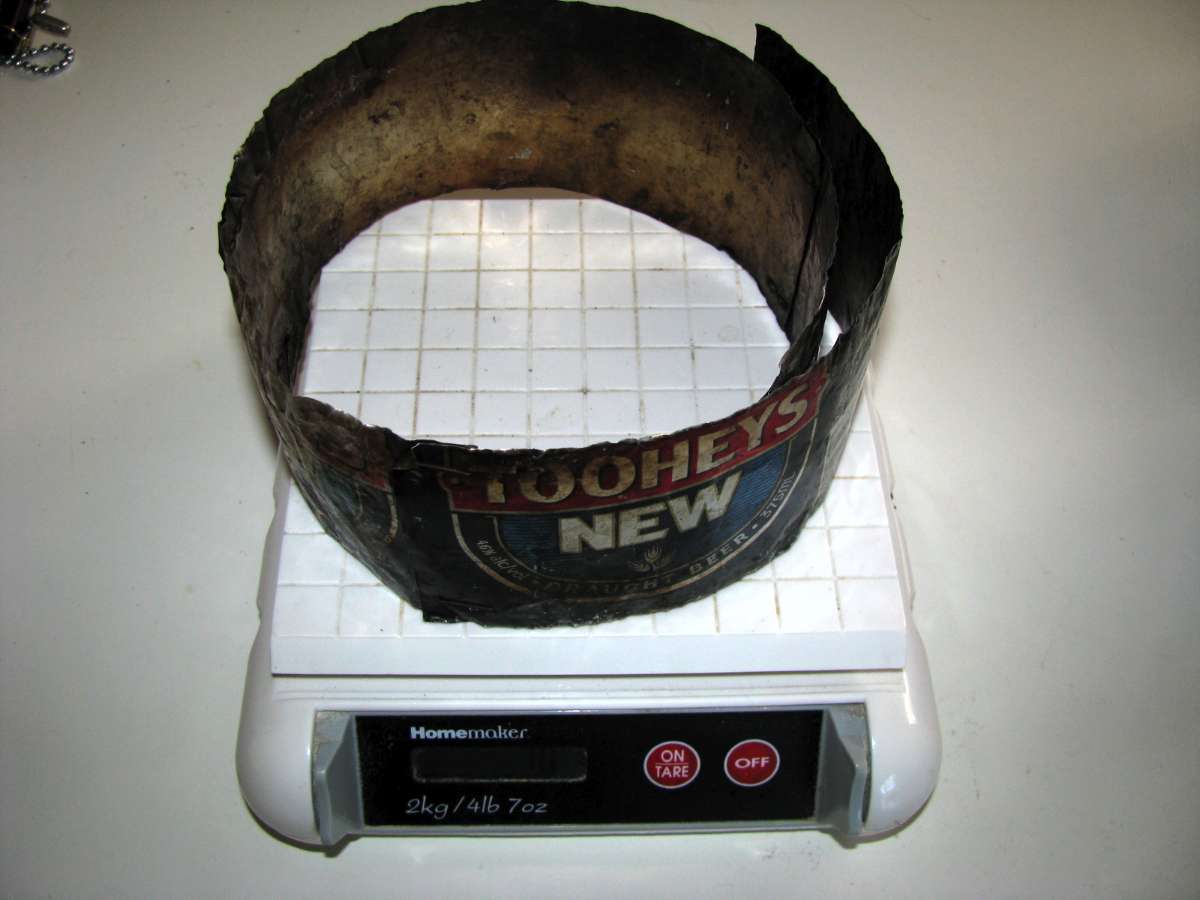
This windshield is made from the sides of beer cans stapled together, and works well. It weighs 10 grams.
Photo: Don Hitchcock January 2009
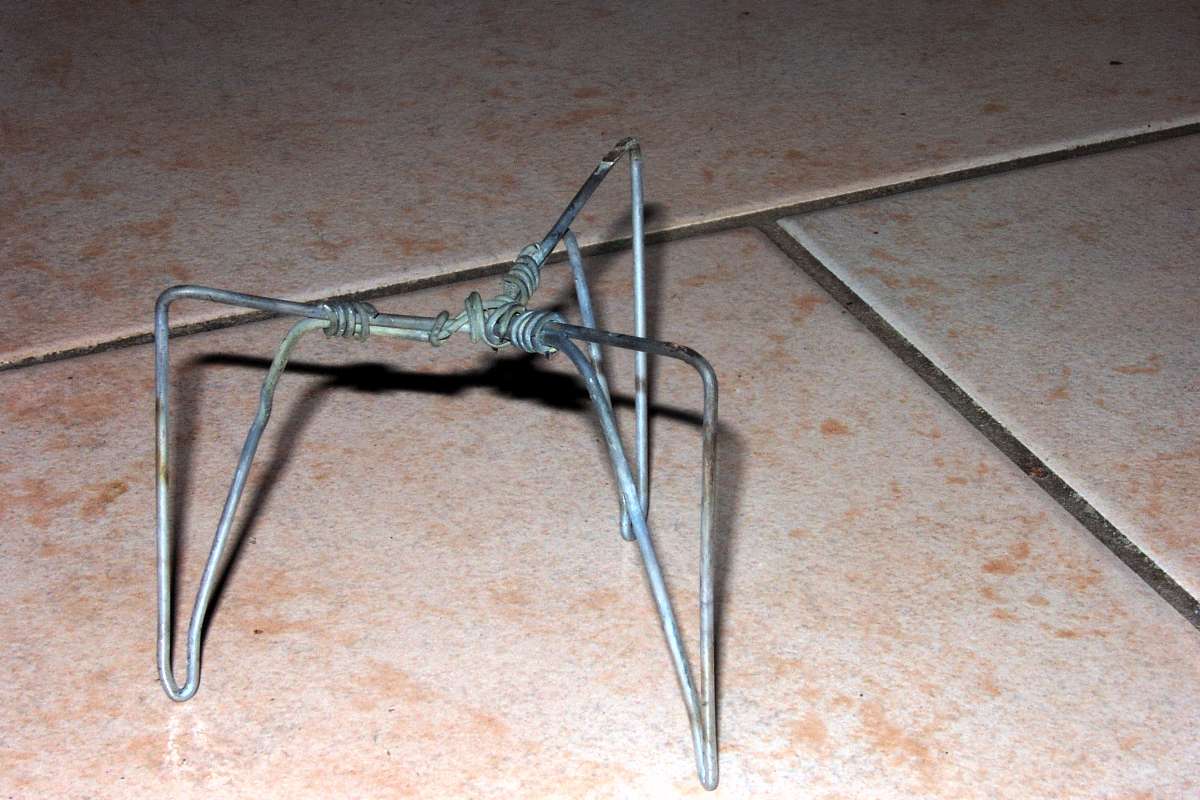
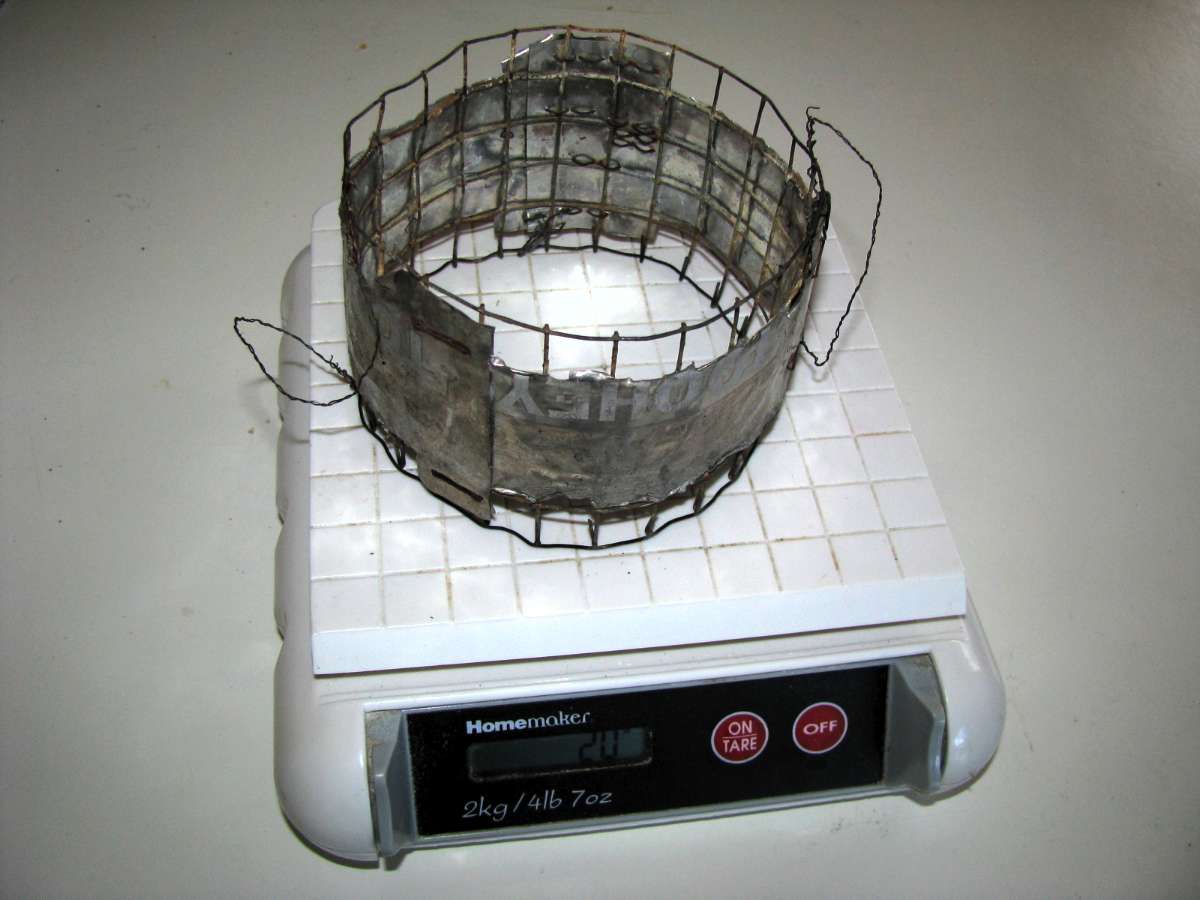
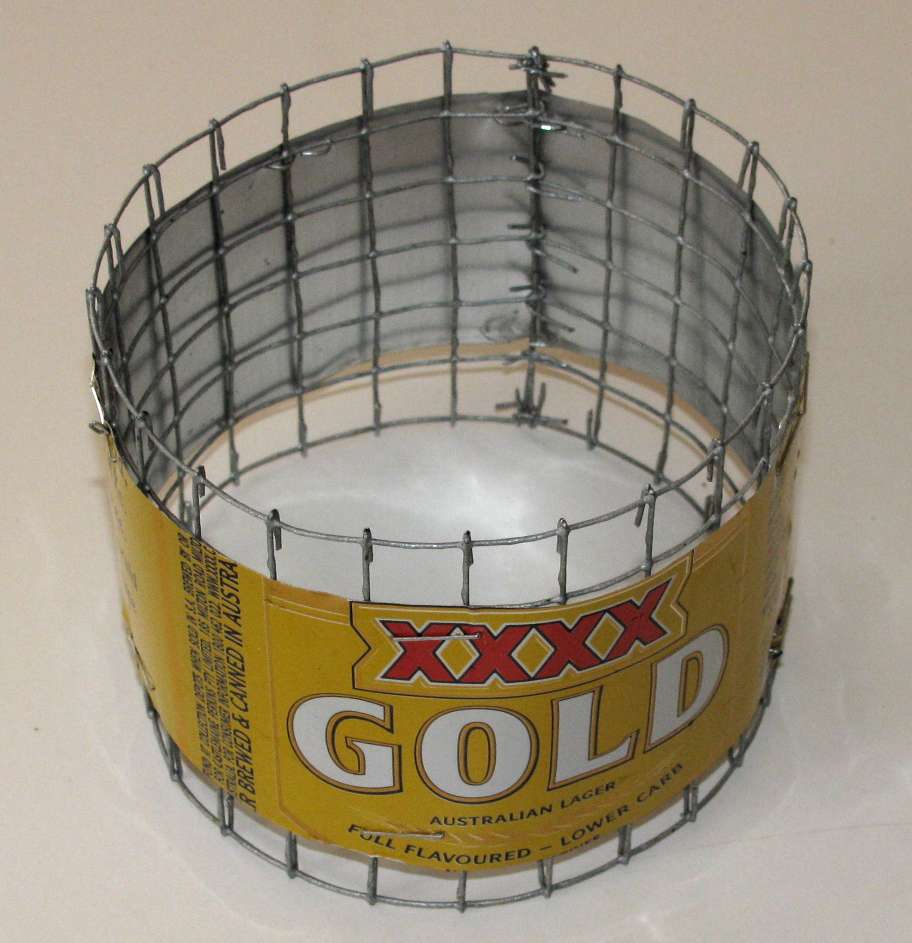
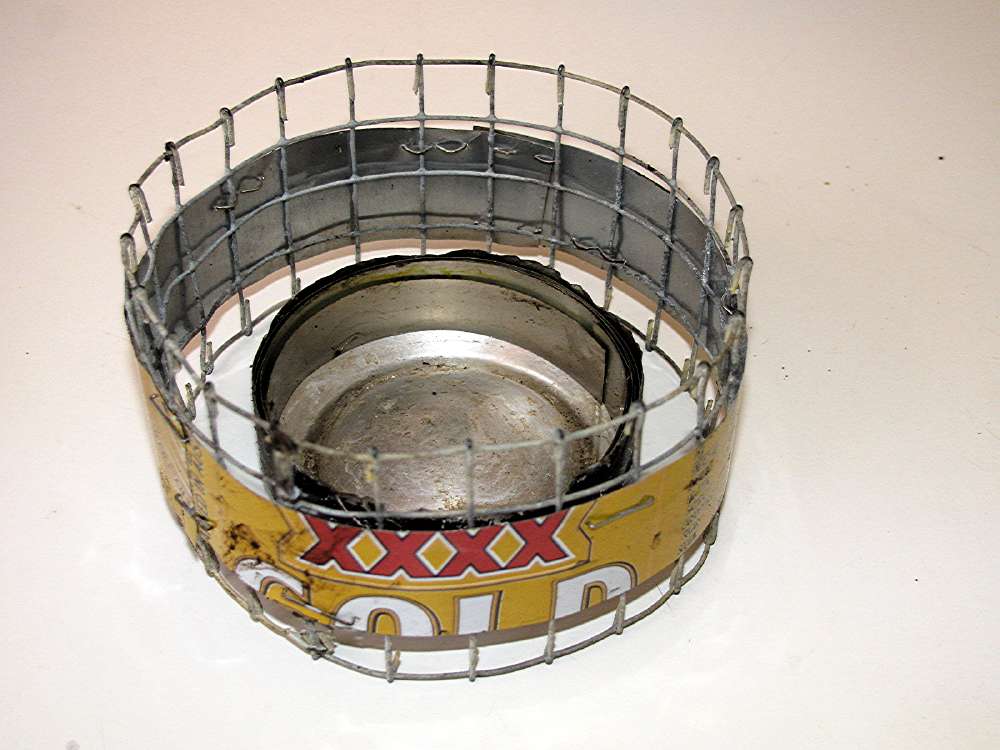
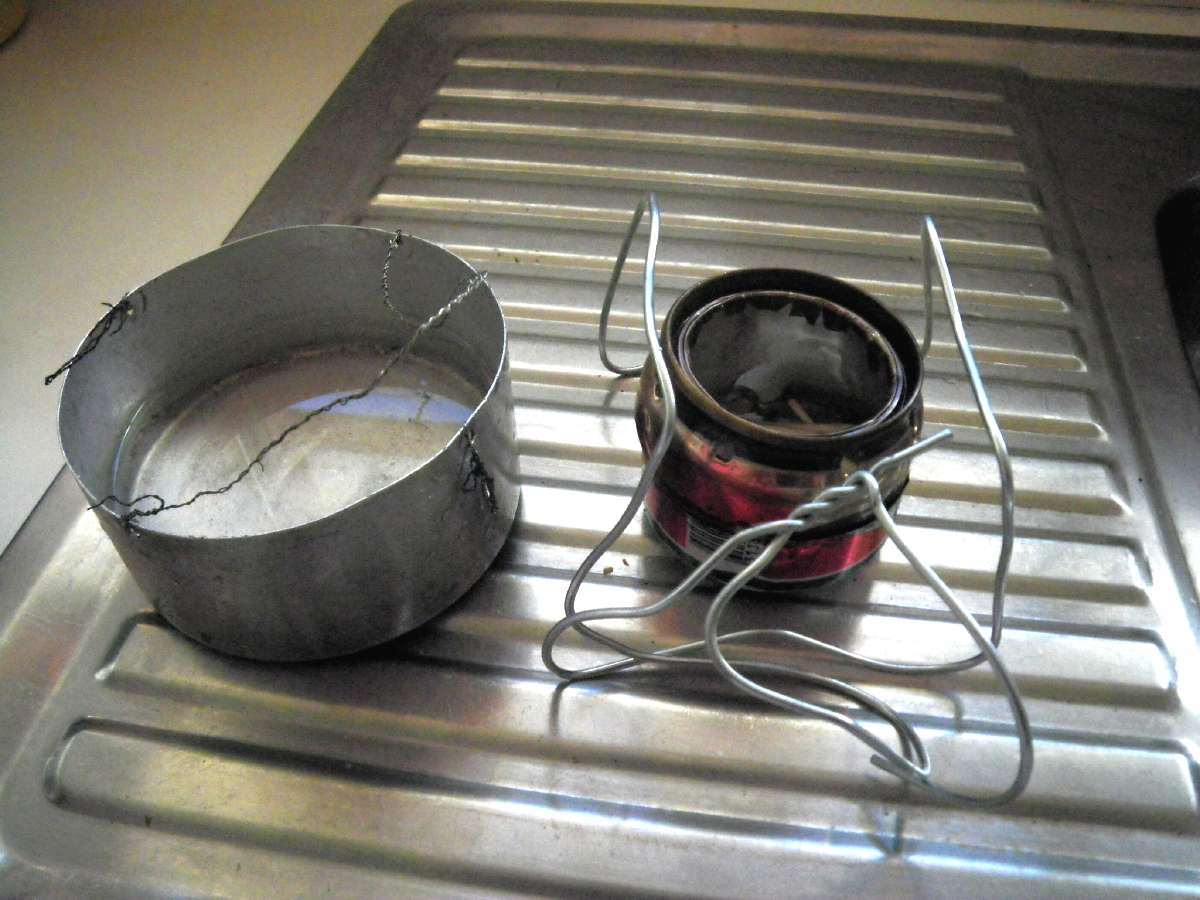
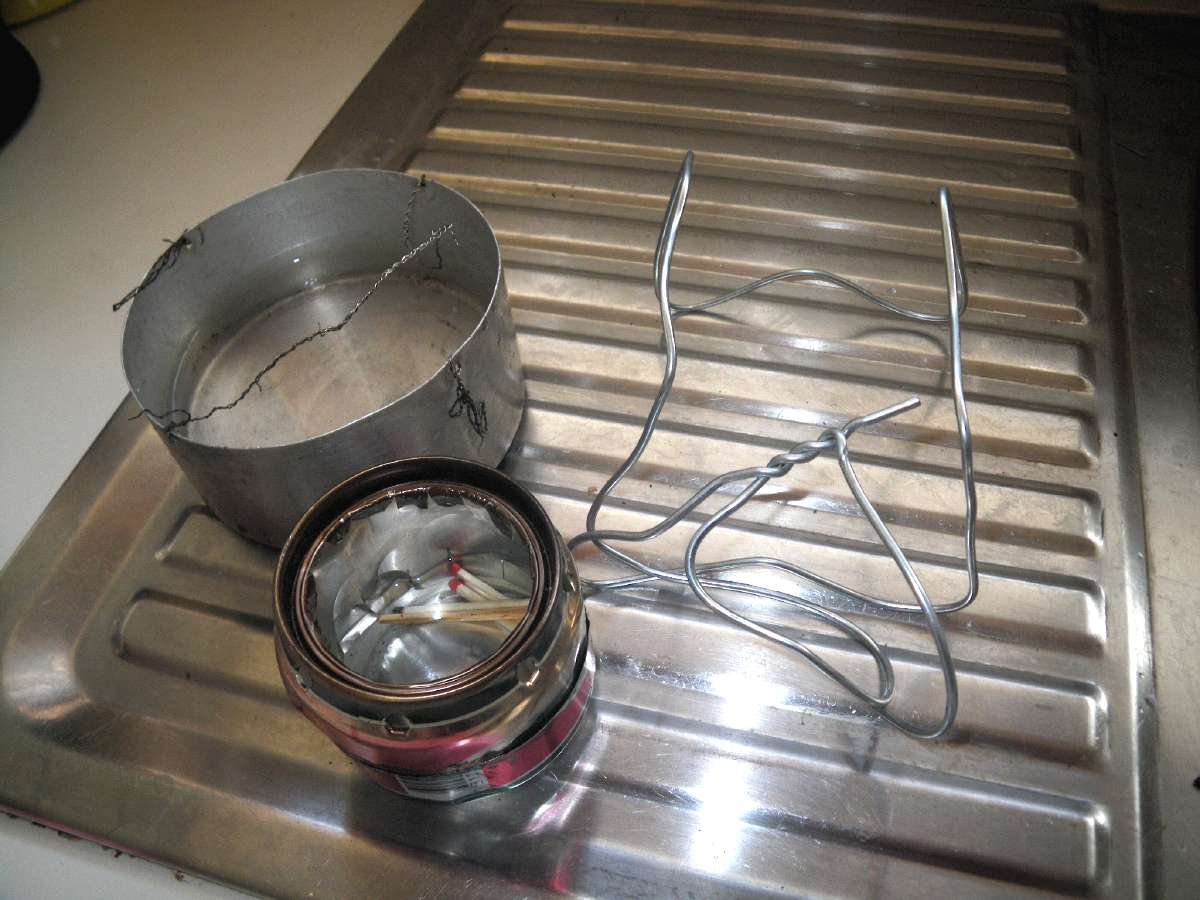
On the left is a 20 gram pot support (I call it a "roundpod") made from wire mesh and the sides of beer cans as a primary windscreen. It works very well, but eventually the wires erode away because of the heat and oxidation, but it fails gracefully, giving you plenty of time to make another, which takes only a few minutes. This one has lasted well over six months, including two months of continuous use for three meals a day and numerous coffee brew-ups during a trip to Europe in 2008.
On the right is a tripod made of a coat hanger. It also weighs about 20 grams, but is not as stable, and has no windshield. In addition, I had to attach a piece of stainless steel wire and a piece cut out from a brightly coloured aluminium drink can to it. It was otherwise virtually impossible to see if you put it down on leaf litter beneath a gum tree, and I used to pat the ground looking for it sometimes, until I hit on the idea of something light but more easily seen attached to it.
Photo: Don Hitchcock January 2009, March 2004
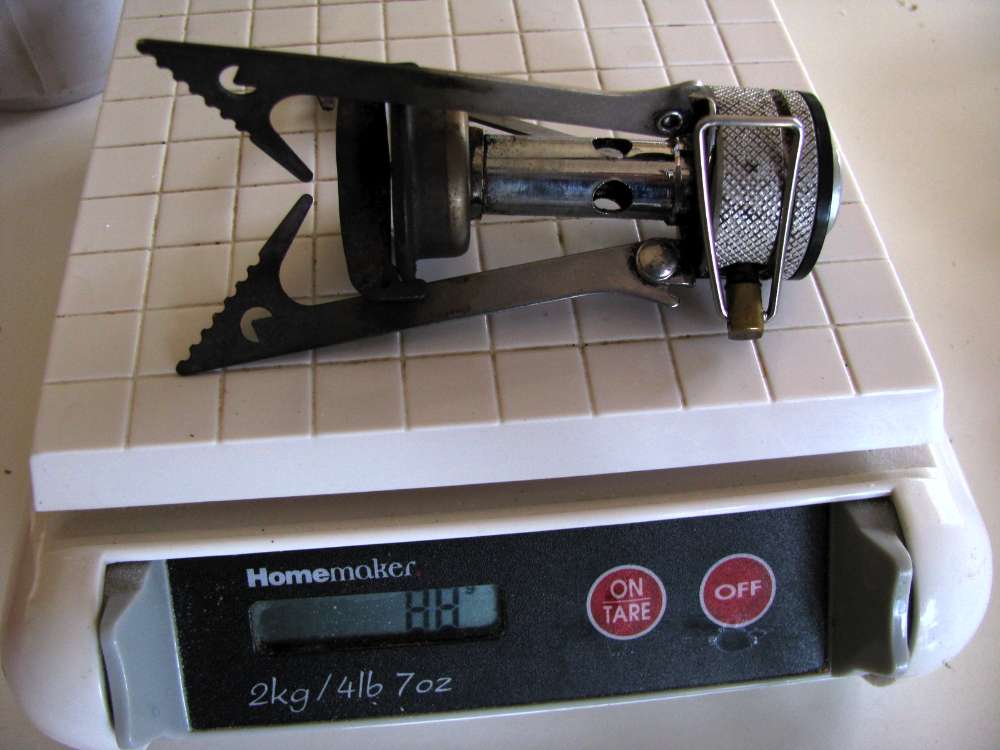
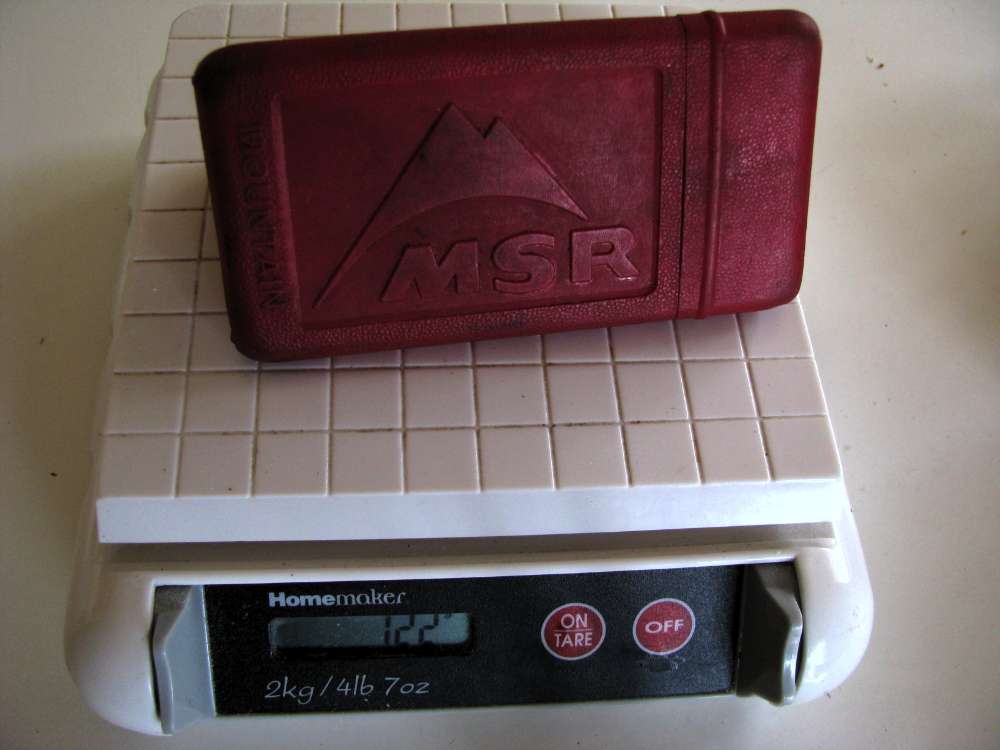
The Pocket Rocket is a great little stove for propane/butane canisters, it weighs about 90 grams, but surprisingly when you add the really well made plastic case, the weight becomes 122 grams! If you decide to use this excellent stove, a lighter case would be a big help. I'd use a small coke bottle with the top cut out, or dispense with a case altogether, storing it in a billy.
Photo: Don Hitchcock January 2009
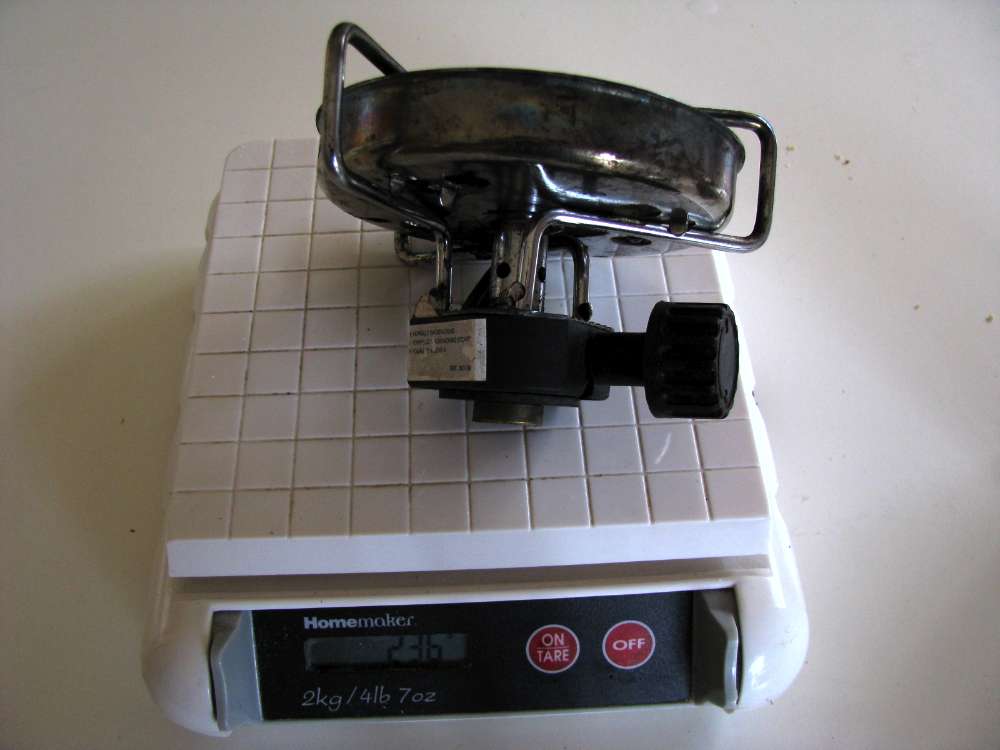
I bought this Coleman before I found out about the Pocket Rocket, and it weighs 236 grams. It is serviceable and stable and cheap, but only suitable for car camping because of its weight.
Photo: Don Hitchcock January 2009
I am always looking for the ultimate bushwalking stove, and this is a method I thought might work, and I decided to try, when having lunch on a lookout on the way up St Helena Ridge.
I carefully cut three sides of a rectangular hole with my sharp knife in one side of a soup packet, folded the "lid" so formed back out of the way, and put the soup mix into my cup, then filled the empty soup packet (aluminium foil and paper and plastic) with fine gravel and clay. Then I poured two coca cola caps of methylated spirit (denatured alcohol, spiritus) into the mix, and lit it.
It boiled a cup of water for my soup with no problems! It could have been re-used many times, and must come close to being the lightest possible stove.
Note that the roundpod here sitting on a flat rock to get it away from flammable material was obviously very new. I made it for a bushwalking trip on the Overland Track in Tasmania in January 2006. It lasted without significant deterioration despite regular use until mid 2008, about two years. Note that I now leave one row of squares open top and bottom, since I found that the flow of air was better that way.
Photo: Don Hitchcock April 2006
Other Stoves and Design Criteria
Since too many stoves are never enough, here is some more data, and some more designs for those interested in alcohol stove variations.
These come from Ian MacLeod, who has done a lot of research and original design on alcohol stoves.
Note that Ian uses Isopropyl Alcohol in all his stoves.
Energy Comparisons for various fuels:
Ethanol contains 26.8 kiloJoules per gram, and has a density of 0.789 g/cm³ (at 20 °C) - this gives 21.1 kJ/ml
Isopropyl alcohol contains 24.04 kiloJoules per gram, and has a density of 0.786 g/cm³ (at 20 °C) - this gives 19.2 kJ/ml
Thus Ethanol has marginally more energy, about 10% extra energy per ml of fuel, and has much the same density as Isopropyl Alcohol.
For comparison, propane has an energy of 46.44 kJ per gram, about 70% more than ethanol - but the weight of the canister and the heavier stove needed to burn it, and the fact that empty canisters must be packed out, makes alcohol the better fuel for those counting the grams in my opinion.

First, a paper by Ian which answers some fundamental questions about alcohol stoves, and discusses a couple of different types.
Ian's Paper Part 1
Ian's Paper Part 2
Photo: Ian Macleod January 2010
Next another paper by Ian which goes into detail about the stove he calls El Diablo, and I call The Blowtorch
This stove is a real blowtorch, and uses alcohol of any grade that will burn, or even cheap whiskey!
For fast boil times, this fan assisted burner is the way to go.
Ian's Paper on El Diablo, AKA The Blowtorch
Photo: Ian Macleod February 2010
Yet another paper by Ian, this time on the El Diablo Grande. The stats are amazing.
Water quantity: 250ml (about 1 cup)
Water temperature: 38F (about 3.3C)
Pot material: Thick walled stainless steel (not the most conductive)
Pot cover: Glass rimmed with metal. (Lets me see inside as it cooks)
Fuel used: 95% Isopropyl Alcohol. (contents rated at +5%)
Quantity Fuel used: 25ml. (measured with a syringe)
Ambient temperature: 36F (about 2C)
Warm-up Time permitted: None. This baby needs NO WARMUP TIME.
Soft boil time: 1:10 For soft boil, bubbles regularly jumping off the
bottom of the pot, this is a very impressive boil time.
It beats El Diablo I by nearly 18 seconds!
Hard boil time: 1:19 For hard boil, water rolling and tumbling on the
surface, this is my best time yet. It beats El Diablo
I by over 10 seconds!
Ian's Paper on El Diablo Grande
Photo: Ian Macleod February 2010
Distance stove to pot
Distance from stove to pot can be critical, and may be quite different for different stove designs:
Ian writes:
3cm is ideal distance from base of flame to base of pot. This is not just an arbitrary number, it's been tried outdoors and indoors and it makes a world of difference:
Interesting stuff here ... These are with a Trangia Clone
6cm: Boil Time 9:50
5cm: Boil Time 8:18
4cm: Boil Time 6:50
3cm: Boil Time 5:57
2cm: Boil Time 5:35 with difficulty keeping it lit in the wind
1cm: Boil Time FORGET IT. Flame self extinguishes
These are with your design "Don's Dilemma" SS
6cm: Boil Time 9:18
5cm: Boil Time 8:00
4cm: Boil Time 6:18
3cm: Boil Time 5:20
2cm: Boil Time 4:15
1cm: Boil Time 4:58
All these were done beginning with a cold stove and pan. The same pan, the same kitchen table, etc. I am seeing that the SS unit is much happier hugging up close to the pot, while the other has little tolerance for "getting close" to the pot.
Ian's "Nasty Cat" Stove
Ian writes:
This is an inspiration taking the pleated vent technology for directing hot alcohol vapour and combining it with directing air intake holes. I did this all in a "No Pot Stand" type stove.
It is a pressure side vented directed air type stove. The only one quite like it that I am aware of. Light this one up, wait about 15 seconds (20 with 75% alcohol) and whoosh! Put your pot right on top. All the advantages of a CAT stove yet in a smaller but still stable package. Its stability comes from its low profile. Its strength is inherent in the design. Even though it’s all aluminium it’s tough enough for a 7 inch diameter pot full of water.
Photo: Ian Macleod, January 2010
(What I love about this stove is that it is what I call an "airport" stove. That is, with a few tools, you can have a stove and stand ready to go in a short time from an abandoned aluminium can upon arriving at your destination. It could even be made from an aluminium drink can with nothing more than a sharp knife and a pair of scissors - though the right tools would make it a lot easier to do, it would still be very possible with the bare minimum.
Another big advantage over your ordinary CAT stove is that the flame is directed upwards instead of sideways.
This stove really takes off, and is faster to light, if you add a virtual wick between the pleated top and the base, made from a strip of the aluminium can, kept just below the lip of the base. - Don.)
Ian continues:
Here we go:
With a can opener, take out the top of a Coca Cola tin. Then cut off the bottom 25mm and the top 20mm.
Photo: Ian Macleod, January 2010

Using needle nose pliers, put in a million tiny pleats. If it looks good it works well.
Photo: Ian Macleod, January 2010
This is how it should look with the pleats put in and the top cut out.
Photo: Ian Macleod, January 2010
Note that the base had to be cut back below the holes, leaving three cm between the top of the base and the top of the stove, which the pot sits on, in order to get the best results as a CAT stove. You can get similar results by increasing the height of the base and the top to leave that same three cm gap, but allowing a longer burn time by being able to put more fuel into the taller base.
Photo: Ian Macleod, January 2010
In her glory. This is the Nasty Cat Stove. She supports her own weight and then some.
Photo: Ian Macleod, January 2010
Nasty Cat: Lights up in a second and comes to temperature in about 10~15 seconds.
A bit noisy as you can hear the alcohol boiling up the fluted pleats fighting its way to the surface and aided by a little mix of hot vapour and air from the holes I punched in it. Put on the pot and watch it boil!
Water boil is very fast, on a par with Don’s Dilemma and the Turbo Tuna Surprise.
Burn time on 30ml 75% was 14 minutes.
Pros:
- Lights fast and easily.
- No pot stand needed, can be used as open flame or CAT stove.
- Stable low profile design.
- Fast warm up time.
- Fast boil time.
- Long burn time, especially for such a small and light cooker.
- Extremely light weight.
- Relatively solid, strong.
- Not too difficult to construct and cheap as they come!
- Not as strong as if it were steel.
- Doesn’t store the fuel for later use. Easy enough to drain, or use a syringe.
Data:
CAT mode: no pot stand used
17ml Alcohol 75% (maximum capacity 30ml)
Water at 38F 250ml in covered steel pot with glass lid.
Hard Boil: I mean hard with the water churning: <6 minutes.
Burn Time: I mean til when it goes "pop" and out. 8 minutes.
Using 95% alcohol:
Hard Boil: <5 minutes.
Burn Time: 17 ml 8 minutes. Using 30ml gives >14 minutes which is impressive.
Open flame mode: pot stand used
17ml Alcohol 75%
Water at 38F 250ml in covered steel pot with glass lid.
Hard Boil: As above: 3:20
Burn Time: As above: 5:30
17ml Alcohol 95%
Hard Boil: As above: 2:30
Burn Time: As above: 4:45
Bushwalking Index
Lightweight Bushwalking / Hiking Gear
Anyone (e.g. students, libraries, government agencies such as tourist bureaus, the general public) may use, print and publish the photographs taken by me and presented on this bushwalking file for any legitimate non-commercial purpose, at no cost, and without asking permission. However a note such as "Photo: Don Hitchcock" somewhere in the document would be appreciated if it is to be published.