Back to Don's Maps
Footwear from the Stone Age
Scientists Find 5 500-Year-Old Preserved Shoe In Cave
June 9, 2010
About 5 500 years ago someone in the mountains of Armenia put his best foot forward in what is now the oldest leather shoe ever found.
It'll never be confused with a penny loafer or a track shoe, but the well-preserved footwear was made of a single piece of leather, laced up the front and back, researchers reported Wednesday in PLoS One, a journal of the Public Library of Science.
Worn and shaped by the wearer's right foot, the shoe was found in a cave along with other evidence of human occupation. The shoe had been stuffed with grass, which dated to the same time as the leather of the shoe — between 5 637 and 5 387 years ago.
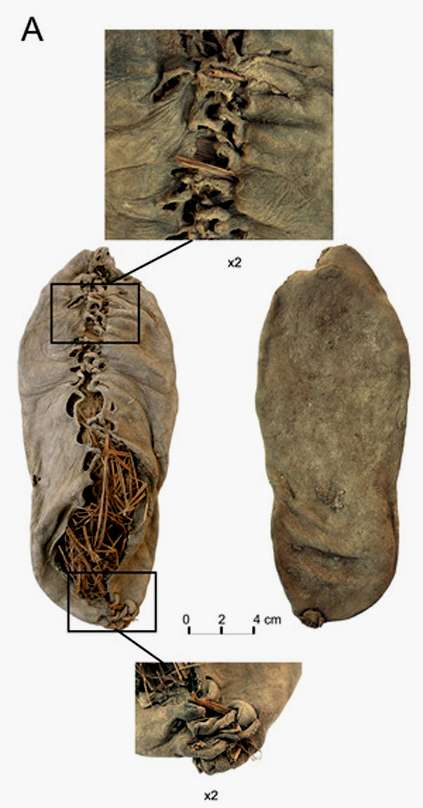
A handout photo provided by the Department of Archaeology at University College Cork in Ireland shows the shoe that was recovered in a cave in Armenia.
Photo: Department of Archaeology, University College Cork/AP, http://www.npr.org/templates/story/story.php?storyId=127627752
"This is great luck," enthused archaeologist Ron Pinhasi of University College Cork in Cork, Ireland, who led the research team.
"We normally only find broken pots, but we have very little information about the day-to-day activity" of these ancient people. "What did they eat? What did they do? What did they wear? This is a chance to see this … it gives us a real glimpse into society," he said in a telephone interview.
Previously the oldest leather shoe discovered in Europe or Asia was on the famous Otzi, the "Iceman" found frozen in the Alps a few years ago and now preserved in Italy. Otzi has been dated to 5 375 and 5 128 years ago, a few hundred years more recent than the Armenian shoe.
Otzi's shoes were made of deer and bear leather held together by a leather strap. The Armenian shoe appears to be made of cowhide, Pinhasi said.
Older sandals have been found in a cave in Missouri, but those were made of fiber rather than leather.
The shoe found in what is now Armenia was found in a pit, along with a broken pot and some wild goat horns.
But Pinhasi doesn't think it was thrown away. There was discarded material that had been tossed outside the cave, while this pit was inside in the living area. And while the shoe had been worn, it wasn't worn out.
It's not clear if the grass that filled the shoe was intended as a lining or insulation, or to maintain the shape of the shoe when it was stored, according to the researchers.
The Armenian shoe was small by current standards - European size 37 or U.S. women's size 7 — but might have fit a man of that era, according to Pinhasi.
He described the shoe as a single piece of leather cut to fit the foot. The back of the shoe was closed by a lace passing through four sets of eyelets. In the front, 15 pairs of eyelets were used to lace from toe to top.
There was no reinforcement in the sole, just the one layer of soft leather. "I don't know how long it would last in rocky terrain," Pinhasi said.
He noted that the shoe is similar to a type of footwear common in the Aran Islands, west of Ireland, up until the 1950s. The Irish version, known as "pampooties" reportedly didn't last long, he said.
"In fact, enormous similarities exist between the manufacturing technique and style of this [Armenian] shoe and those found across Europe at later periods, suggesting that this type of shoe was worn for thousands of years across a large and environmentally diverse region," Pinhasi said.
While the Armenian shoe was soft when unearthed, the leather has begun to harden now that it is exposed to air, Pinhasi said.
Oh, and unlike a lot of very old shoes, it didn't smell.
Pinhasi said the shoe is currently at the Institute of Archaeology in Yerevan, but he hopes it will be sent to laboratories in either Switzerland or Germany where it can be treated for preservation and then returned to Armenia for display in a museum.
Pinhasi, meanwhile, is heading back to Armenia this week, hoping the other shoe will drop.
The research was funded by the National Geographic Society, the Chitjian Foundation, the Gfoeller Foundation, the Steinmetz Family Foundation, the Boochever Foundation and the Cotsen Institute of Archaeology at UCLA.
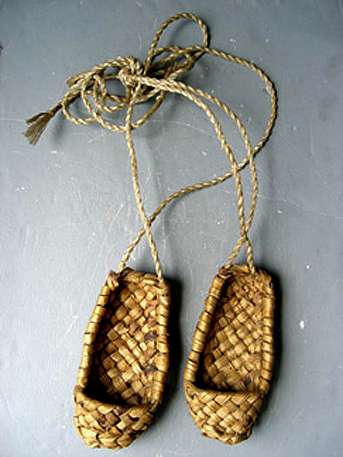
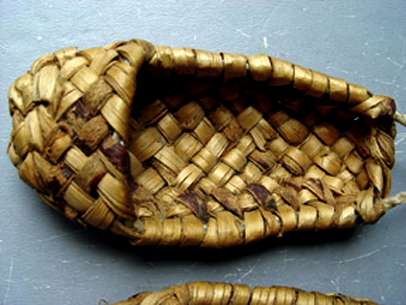
Bast Shoes

Bast shoes are shoes woven primarily from bast of the linden tree or from birch bark, a kind of basket fitted to the shape of a foot. It is an obsolete traditional footwear of forest areas of Eastern Europe used by a poorer population of Finnic people, Balts, and Slavs. They were easy to manufacture, but not very durable.
Bast shoes have been worn since prehistoric times, Wooden foot-shaped blocks used to shape bast shoes are found in neolithic excavations. Bast shoes were still worn in the Russian countryside by the beginning of the 20th century. In modern times bast shoes are sold as souvenirs and sometimes used in the attire of ethnographic music or dance troupes.
In Russian, they are called lapti, and this word is used as a derogatory term for cheap and short-lived footwear and uneducated people.
In the 19 century they were the basic kind of country footwear in Russia.
Text: Wikipedia
Photo: Vladimir Gorodnjanski, 2006
Lapti
text below from:http://www.strangelove.net/~kieser/Russia/KWCfeet.html
The most archaic form of foot-wear, which existed in ancient Russia, is lapti (bast sandals), plaited from the bast or inner bark of the linden, birch and other species of trees. Researchers of clothing have determined that they were known in the Stone Age. In the early layers of Old Russian cities they are almost unknown. In Novgorod was discovered only one bast sandal, found in the 15th century layers. For the existence of lapti in earlier times they give evidence of finds of instruments for the weaving of lapti - weaving tools (kochedyk), besides the presence of woven foot wear in tombs.
Photo: http://cgi.ebay.com
In antiquity, there were several names for footwear of the lapti type: "lych'nitsa", "lychak'" and "lap't'", derived from - "lapotnik'" - known in the written sources and going back, in the opinion of researchers, to the proto-Slavic (praslavyaskoj) epoch.
The earliest image of lapti dates from the 15th cent. On a miniature from Sergius Radonezhskiy's Life is presented a scene of ploughing with the peasant in lapti. Townspeople, obviously, did not wear lapti. Probably, lapti were work foot-wear, connected with field work. Lapti were always, up to 19-20th cent. worn by the poorest people.

Lapti or "sandals" could be worn tied on with special lacing threaded through eyelets on the sides of the sandal. They were worn mostly by rural inhabitants.
Lapti were fastened by means of long strings, "obory", passed through the side of the lapti and wound around the feet and legs. Footwear made of bast were worn over stockings, the socks, nogavits (nogavits, hose?) and windings (obmotok, leg wraps).
Lapti were usually woven of bast (the inner bark of larch or birch trees). The bark was prepared by soaking a long time, then flattened under a press. It took 3 or 4 saplings to make such a pair of shoes, and a pair might last only a week, even those woven "with podkovyrkoj" (double sole).
Photo: http://cgi.ebay.com

Such shoes could also be woven out of strips of coarse leather. These were more durable than bast, but also more expensive. So in order to combine low price with durability, in the country they often used combined weaving of lapti from bast and leather straps. In cities lapotsy in the 12th - 14th century were made also of "cuts" of fabric, little pieces of smooth wool cloth and even of silk ribbon. In that case they were called pleteshki (wicker/weaving).
Soles from woven leather straps are found in the Lyadinskom tomb and in the kurgan of the Vyatichi. On the basis that on the inner side of the sole from the Lyandinskoj tomb were preserved the remains of the bast tapes of the lapti itself, V.P. Levashova proposed that the woven leather soles from the Vyatichey kurgan could also belong to ordinary bast.
Photo: http://cgi.ebay.com
Lapti of the above-indicated tombs had different weaving: the soles from the Lyadinskogo tomb were slanting weaving, the sole from the kurgan of vyatichey - straight line. [diagonal/bias vs. square].
Various weaving patterns were used (oblique, straight) depending on the traditions of the ethnic region. The form of laptej also varied depending on locality: southern and Polesski lapti were open, while northern - "bakhili" - had the form of a narrow boot.
Judging by materials of recent ethnography, lapti could be in the form of shoes with low sides, similar to the Polesskij lapti of straight interweaving, and in the form of deep closed shoes of the northern type of slanting interweaving, known in the Novgorod lands.
A fable
The Man with the Bast Shoes
Text below from: http://www.sacred-texts.com/neu/hoe/hoe2-77.htmOnce upon a time a traveller came to a village and asked for a night's lodging. He was handsomely dressed, but he had coarse bast shoes on his feet. A friendly farmer received the stranger hospitably, and offered him accommodation. At night the man asked his host, "Farmer, where shall I put my bast shoes?" The farmer showed him the place, but he added, "No, my shoes must spend the night among the feathered people, for that is what they are used to. So I would rather hang them on the perch in the hen-house." The farmer laughed at the joke, and permitted him to do so.
As soon as all were in their first sleep, the owner of the bast shoes rose from his bed, slipped into the hen-house, tore the shoes to pieces, and scattered the coarse plaits among the fowls. Next morning he went to the master of the house and complained, "Farmer, my property was badly damaged last night." Said the farmer, "Well, let whoever has done the mischief make it good." This was just what the stranger wanted, and he immediately caught the dappled cock, and put him into his knapsack, "for," said he, "he's the culprit; last night he pecked at my shoes till he spoiled them." Then he proceeded on his journey with the cock.
On the evening of the same day he arrived at a neighbouring village, and asked again for accommodation. At night he put the cock in the farmer's sheep-pen, and excused himself by saying, "My cock has not been used to anything else since he was a chicken." But at night he strangled the bird, and then complained, "The sheep have killed my cock." He indemnified himself by taking a fat ram from the flock, for he held by the farmer's adage, "He who has done the mischief must pay for it."
By a similar stratagem he exchanged the ram at the third village for an ox, and at last the ox for a horse. He soon contrived to get a sledge too, and drove merrily over hill and dale, till the stones flew behind him, while he contrived new schemes and stratagems. On the way, he encountered Master Reynard, who persuaded him by entreaties and cajoleries to take him into his sledge. After a while, the wolf and bear joined them, and likewise found a place in the sledge; but this made the load too heavy, and when they came to a curve in the road, the side-poles of the sledge gave way. Then the man sent his companions to fetch wood to make a new pole. But none of the three brought a proper one back. The fox and wolf brought thin sticks in their mouths, and the bear brought a whole pine-tree, roots and all. Then the man went himself, and soon found the wood which he wanted. Meantime, the wild beasts availed themselves of the opportunity, and sprang upon the horse and devoured it. But they stuffed the skin nicely with straw, and set it carefully up, so that it stood again on its four legs as if it was alive.
When the man came back with the pole, he mended the sledge and harnessed the horse again. "Oho! now we'll drive on." But alas! the horse would not move. Then the man looked at the red scamp, the grey rascal, and the brown villain, and said angrily, "Give me my horse back." But the wild beasts answered, "You killed it yourself, while we were running about looking for wood by your orders."
Thus they stood quarrelling and disputing, till Reynard considered how he could best put an end to the dispute and save his own skin. He knew of a pit in the neighbourhood which the hunter had dug for a wolf-trap, and covered loosely with thin twigs. "The matter won't be settled by quarrelsome and angry words," cried he; "but come, let the four of us go to the wolf-pit; we will all tread on it at once, and whoever falls in shall be adjudged guilty." The rest agreed, and when they stood on the twigs, they broke under their weight, and precipitated them into the pit, and even Reynard was unable to escape. He had trusted too much to the lightness of his tread, and had trodden on the twigs without consideration. Now they were all in the trap together, and none of them could hope to escape. The time seemed long to them, and their hunger soon became too great to bear.
First of all, the wild beasts attacked the man of the bast shoes and devoured him, and then Reynard had to resign his life. Last of all the bear throttled the wolf. Then came the hunter and gave the bear his quietus. Thus all the four rascals experienced the truth of the proverb, "As the deed, so the reward."
Making bast shoes
This excellent series of photographs is fromhttp://www.wildwoodsurvival.com/survival/clothing/birchbarkshoes/index.html
The rest of the website is well worth visiting as well. This is real survival stuff, the author(s) are real experts. The text below is an edited version of the excellent page on the construction of Bast Shoes. The website is well worth a visit by anyone interested in walking, hiking, bushwalking and survival.
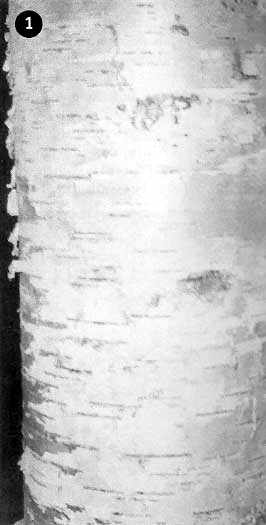
Birch tree. This tree is classified as a hard wood and is plentiful and very visible in most areas of North America.
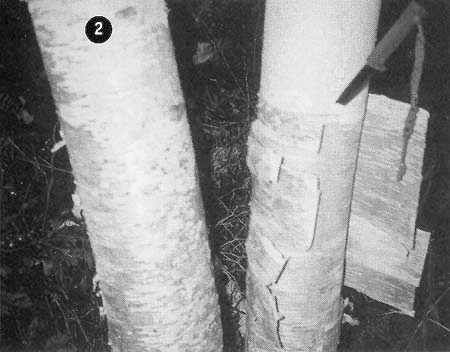
Cut a strip vertically down the tree and pry back the layers of bark.
In the spring the bark will release from the tree easier, being your optimum, but even if it is not spring, this can still be accomplished. The back for the fabrication of the shoes in the photos was acquired in late November. This will ensure the reader that late season bark will also serve our purpose.
With the vertical strip cut, there will be the outer whitish layer and the "leathery" brownish layer. The best I find for fabrication of the shoe is the brownish layer, but as the photos depict, I have also crafted with the outer layer. From photo 2 you can see the difference between the tree's exterior and the interior back layers. Provide yourself with a good number of these bark sheets. The longer the vertical cut and the bigger diameter of tree will provide you with a bigger sheet to take your material from.
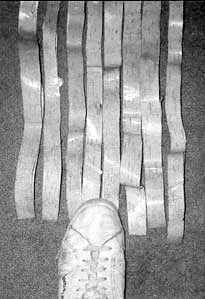
In photo 3 I have taken these sheets and separated the layers of bark, then cut strips from the bark at approximately three quarters of an inch wide and approximately three feet long.
Whether the strips are cut vertically across the bark sheet or horizontally across the sheet will be your preference. Cut a test strip from each direction and pull until breakage occurs. This not only gives you your strength of the strips, but a feel for how tight to pull the strips when fabricating the shoes.
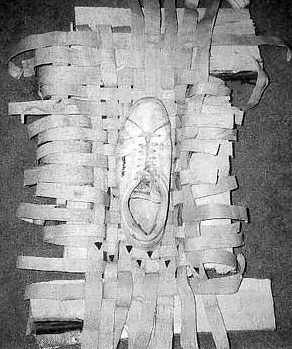
With approximately sixty-five strips of 3/4" wide and 3 foot long, I lay the strips as shown in photo 3 to get a gauge for how wide to lay them. Use your foot as I have done with the shoe in the photo, or draw an outline in the dirt of your foot's dimensions.
Lay approximately eight or nine strips lengthwise on the ground, and this should accomplish this task.
When cutting birch strips from a round tree and trying to lay them flat on the ground, they will seem springy.
So to reduce some of this springy memory, soak these strips in water if available. This should assist greatly with the springiness and also later when the weaving process has begun. You will see that the wet slick strips not only slide easier but form to a mold better.
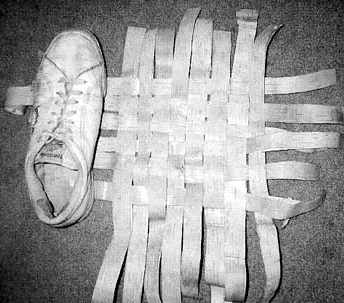
In this photo you can see the weaving process begin with strips laid lengthwise. Now put some strips width-ways, starting at the midpoint of the length strips and coming across the length strips. Take one strip at one side and go under a length strip first, then continue on to the strip laying beside it and go over that strip. Then proceed to the next strip and under again. Continue this process until you have achieved the look of the matting as shown. Snug the strips up now to remat any gaps and to ensure a solid weave.
This shows the process of how to add length to the strips to allow you to make your matting longer or wider.
I have cut the ends of my strips to a point. This facilitates easier weaving of over and under.
Add enough strips length-ways and width-ways to your mat that will give you the size desired.
If you go wider or longer at this point, it will greatly assist your fabrication later on as you will see in the photos.
The matting that is being constructed at this point forms the sole of your footwear, and the added length of strips that are put in, adds to your thickness.

I find it beneficial for the length at this stage to be longer. This will facilitate much easier curvature of the toe section once the front of the shoe is pulled over.
This gives you the idea now of the benefits of the matting being extended beyond your initial dimensions. If you feel that more matting is needed, this is a good opportunity to add to your mat.
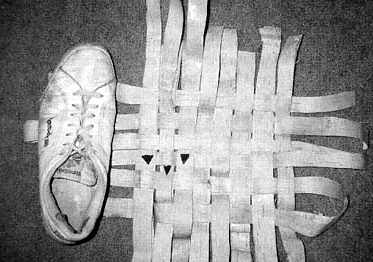
If sufficient then, place your foot onto the mat and find something to assist in forcing up the sides. This is only necessary if you feel you cannot hold the strips in one hand and weave with the other.
In the photo, I have used some pieces of willow that are soon to become my fireboards.
Look for a couple of logs or stones in the bush or dig in the sand a small depression, a little wider than the dimensions of your foot you drew earlier.
With time and practice, you will find fewer items will be needed for assistance.
In this photo the heel is placed where the overlapped strips stopped. Push down on the shoe, or push your foot onto this matting and force the sides up to start to mold your matting into your foot dimensions.
If the shoe's dimensions were out of proportion to your foot, this would only facilitate a sloppy shoe and would not be as effective for mobility.
With the toe section being woven past the tip of the foot, now the front section is rolled over towards the tongue of the foot. Thus, the task of holding and weaving strips is much easier in the forming of the top section.
This shows how this toe section is pulled up towards the top of the tongue, and this edge now becomes the starting rim where your foot will ultimately slide into.
Now that you have the woven mat placed against the tongue section of the shoe, use the width strips to join the sides of the shoe to the top mat section.
While still applying the over and under process, at this stage of adding layer upon layer, the wet strips give some advantage with their slickness. As the stiffness of the shoe becomes apparent, so does the tightness in between the weaves.
To help send the strips through this tightness, the cut, arrowed ends assist in weaving.
When pulling these strips through, snug them up and keep the form of your foot in mind. The tension you can apply on these strips, as you will see, is considerable, as first seen in the test strips. This will, no doubt, give you the idea for the cordage we mentioned earlier.
Continue this process all around the shoe, as the front matting has started the rim of your shoe to slide your foot into.
To fabricate the rim for the rest of your shoe, you will see that when pulling up the sides, a long length strip will go right around the heel section, thus giving you the rim of your heel section for the rest of your strips to weave into.
When you have strips that are longer than your rim, do not cut them off. Just fold them over and weave on the inside with the extra length. This adds layers to your shoe and stiffens the shoe.
Now, to add layers to the inside toe section. This is a difficult task, but if you in the first couple of photos added an extra layer or two, you now have gained the thickness inside the shoe in that section and do not have to do the toe section at this stage with extra length strips. Weave these around the shoe also.
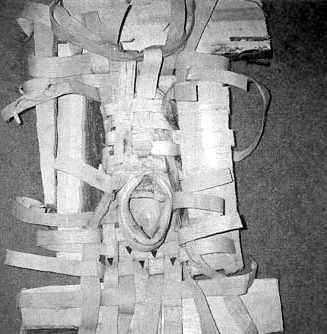
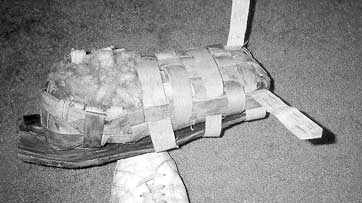
Here we see a somewhat completed formation of the shoe, close to dimensions. At this time, it is best to tighten up the straps and mold the matting and keep adding layers of straps to the exterior and interior of the shoe. The amount of layers one adds will depend on the amount of protection they wish to achieve.
My preference is to add lots now to save having to add lots later.
At this point in fabrication of the shoe, it might feel somewhat "springy." This is normal. By adding more layers and tightening the straps and removing any gaps, soon the springiness will be replaced by solidness.
If your first shoe is imperfect, this can be overcome with practice and visualization. Try making a miniature model at first, say, the size of a children's shoe. This will assist you with forming, holding and weaving the shoe and get the final product more quickly so you can see where you will have some difficulties prior to forming a full-size shoe.

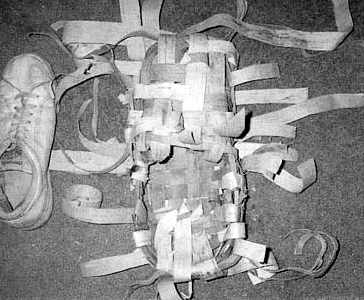
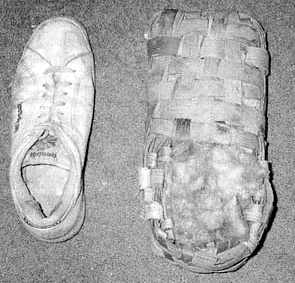
With more strips, lots of tension applied and all gaps reduced, your shoe should look close to this image.
At this stage your foot will easily fit inside the formed shoe. This is the advantage of a shoe, rather than a boot style. The shoe allows more flexibility of the foot in negotiating the bushes and uneven ground, where a boot style has a limited range in the forward motion.
A low shoe doesn't offer much protection in the shin area. This can be supplemented with a slab of birch bark under your pant leg or wrapped around your leg and secured with one of the means described earlier.
The shoe at this point is still not form-fitting enough to eliminate shoe wobble. This is achieved with the help of cattail down, dry leaves or grasses - any dry, soft substance that will warm the foot, compress to contour to the foot and will not cause abrasions.
Here you now see the shoe filled with cattail down. This substance not only warms, but contours well and gives the foot protection on the inside against the edges from the strips, as the strips give the foot protection from the sharp projections of the earth.
Using a small twig, you can force in a lot of down around your foot and fill in the hollows around the foot, causing a tightness to occur which will assist in walking.
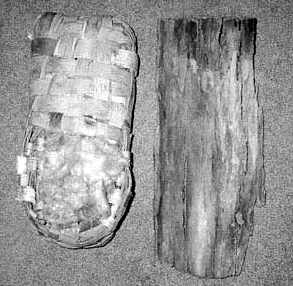
This is a slab of willow bark, which will be placed on the bottom of the shoe to offer another layer of protection from the elements and it will protect the strips as well.
In early mornings when the dew-laden ground becomes slick, this rough bark will give you some lateral stability when negotiating uneven ground.
The attachment of this slab of bark to our shoe follows the same process by which the shoe was fabricated. Put as many strips as are needed to tighten the slab to the shoe to ensure the slab stays solidly attached.